Embark on a Journey with Your Heroes!
What Is Adventure!
Explore maps in this single-player only mode!
Explore the map and beat the boss!
Get rewards from various tiles scattered around the map!
And with Adventure-exclusive Relic items, there are endless ways to play!
So, get ready to go on an expedition with our seasoned Heroes!
So, get ready to go on an expedition with our seasoned Heroes!
How to Play Adventure
Relics, an Adventure-Exclusive Item
- What are Relics?
- Relic Fundamentals
- How You Use Relics Depends on What Kind It Is!
- Prepare the Relic Deck You’re Bringing into the Map!
- Strengthen Your Relics and Create All Sorts of Strategies!
- Obtain Relics in the Relic Challenges!
Other Elements
Extra
If you’ve just started playing TEPPEN, first check out the Beginner’s Guide!

How to Play Adventure
Try Your Hand at Adventure!
Let’s set aside the hard stuff for now and try out Adventure with the following steps!
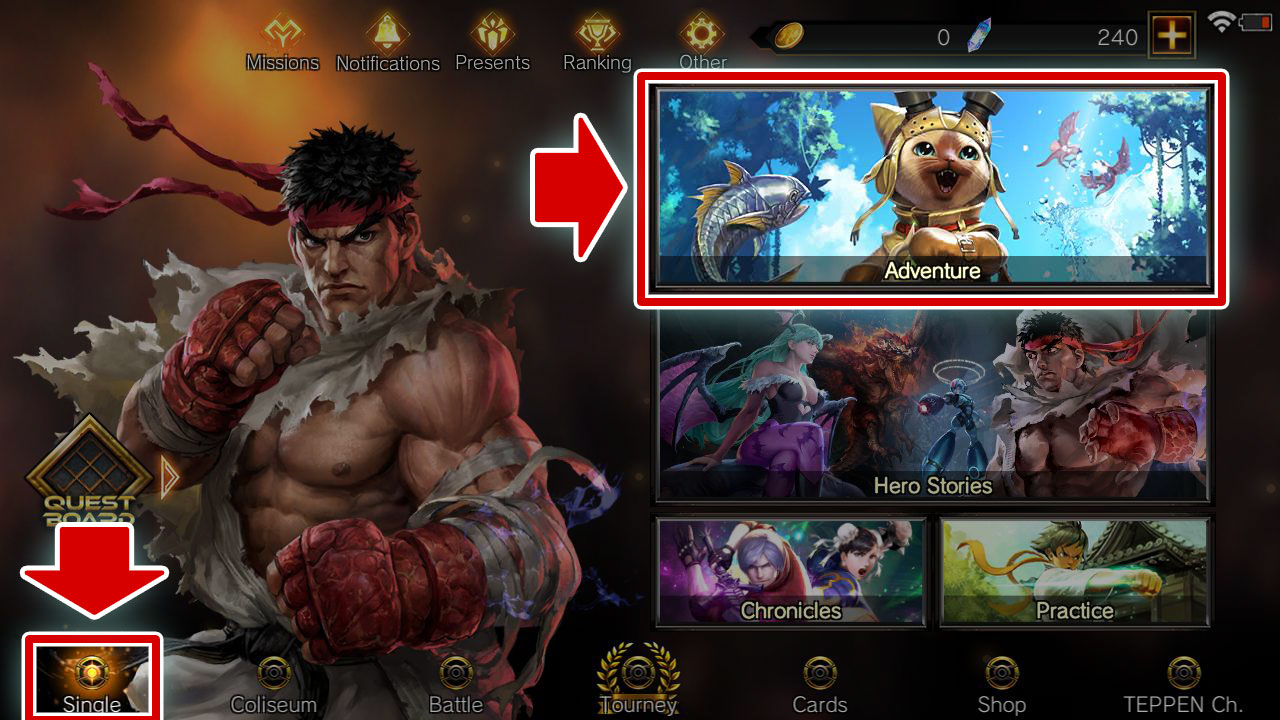 |
1. Select Single → Adventure. |
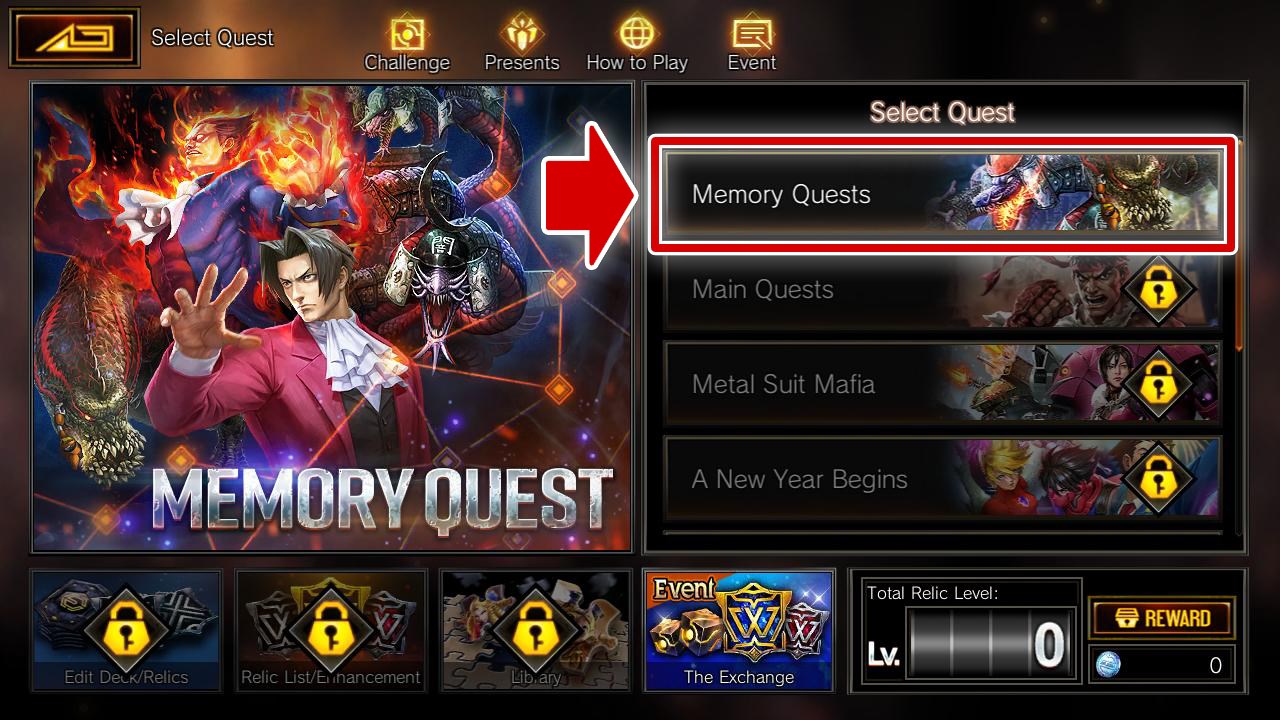 |
2. There are many options, but let’s choose Memory Quests first. |
 |
3. Next, select “Heading out to Find Someone Stronger than Me.” |
 |
4. This is the select deck screen. Let’s leave everything as-is and select Challenge. |
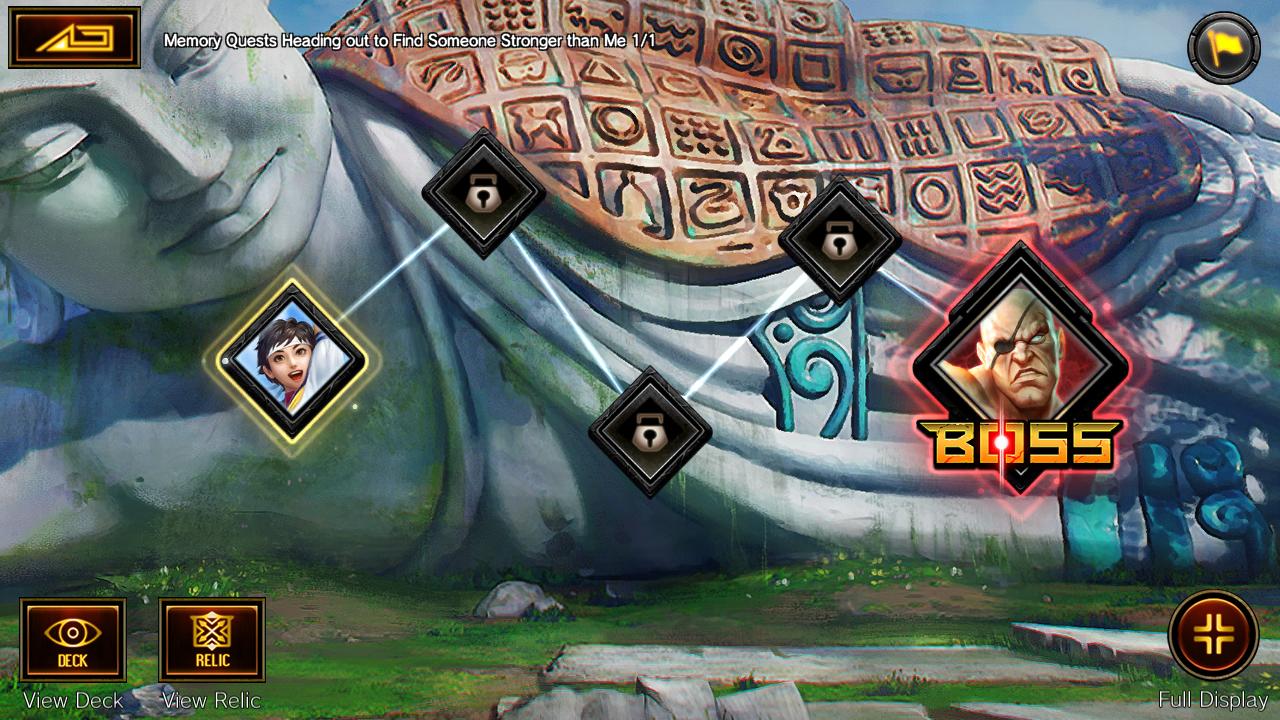 |
5. Once Adventure begins, a map will be displayed. Now to explain how to read the map. |
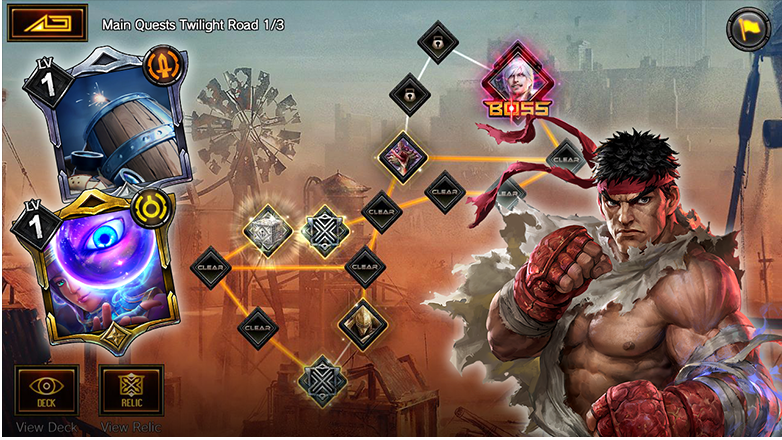
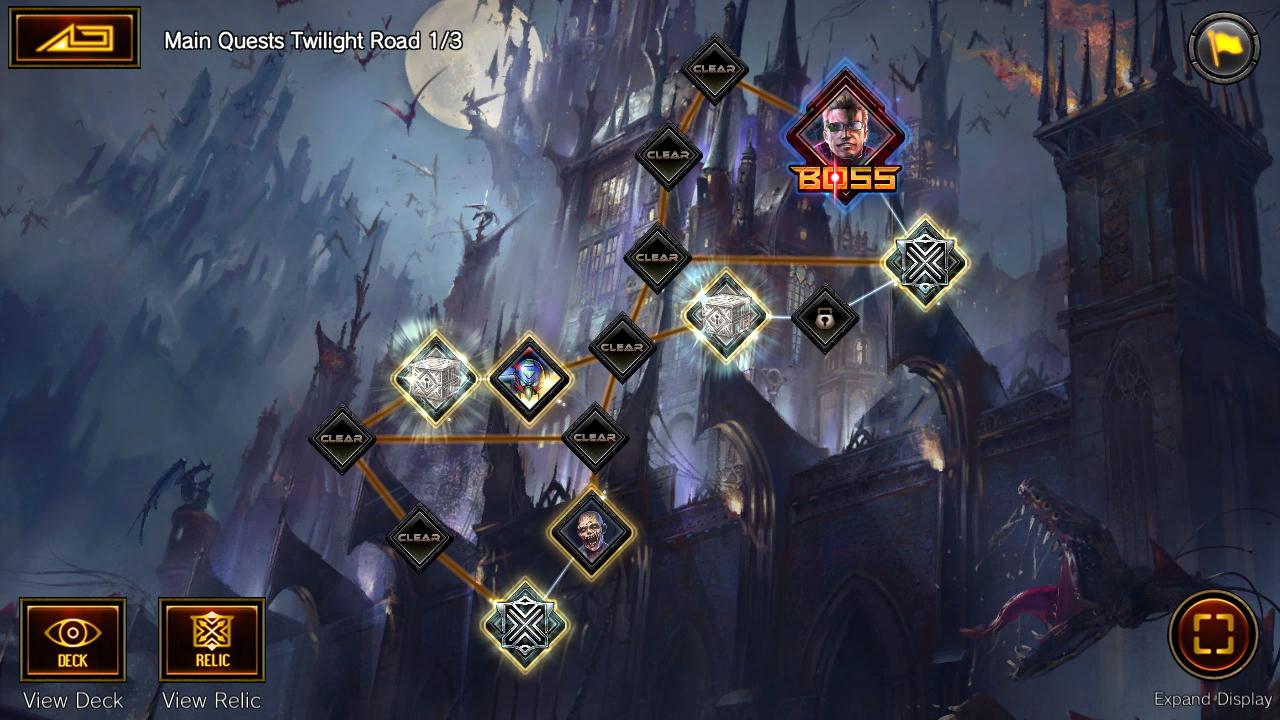
How to Read a Map

1. Map Name
This is the name of the map in progress.
This is the name of the map in progress.
2. Current Stage
A map is composed of several stages.
You can tell the progress of your current stage with the information below.
A map is composed of several stages.
You can tell the progress of your current stage with the information below.
(Current Stage)/(Number of Stages)
3. View Deck Button
You can check the deck you’re currently using.
You can check the deck you’re currently using.
4. View Relic Button
You can view which Relics are usable and which are currently active.
You can view which Relics are usable and which are currently active.
5. Full Display Button
This lets you see the entire map.
Press it again to return to the original view.
This lets you see the entire map.
Press it again to return to the original view.
6. Pause Button
Pause your progress and return to Adventure Top.
While paused, you can play Ranked Match and other modes.
Pause your progress and return to Adventure Top.
While paused, you can play Ranked Match and other modes.
7. Forfeit Button
You can forfeit the map and start over.
You will still get the rewards obtained up until your forfeit.
You can forfeit the map and start over.
You will still get the rewards obtained up until your forfeit.
8.Tiles
Advance through tiles to clear the map.
Advance through tiles to clear the map.
■ The Basics of Traversing the Tiles
Tiles have three different states.
Tiles have three different states.
 |
Open You can select and take on these tiles. These tiles glow yellow! |
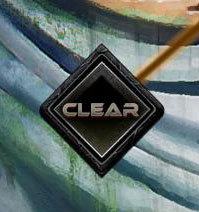 |
Clear These tiles have already been cleared. Clear conditions vary from tile to tile. For more details check “Tile Types.” |
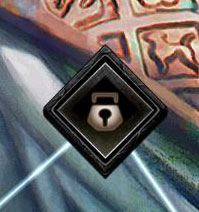 |
Locked These tiles can’t be selected yet. Locked tiles will open after the tiles next to them have been cleared. |
The state of the tiles will change as follows.
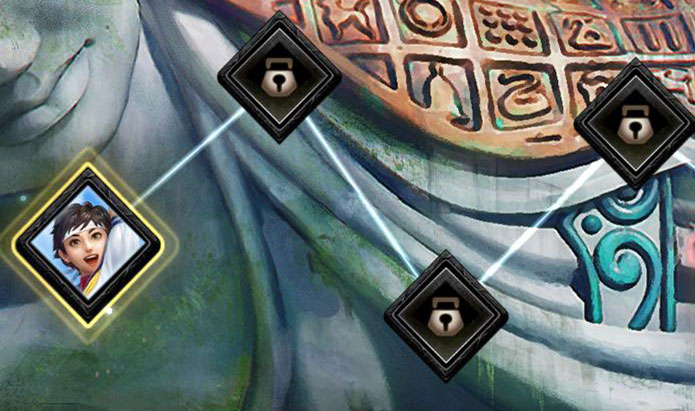 |
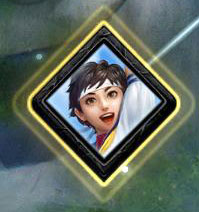
1. When you start a map, only one tile will be open. All other tiles will be locked. |
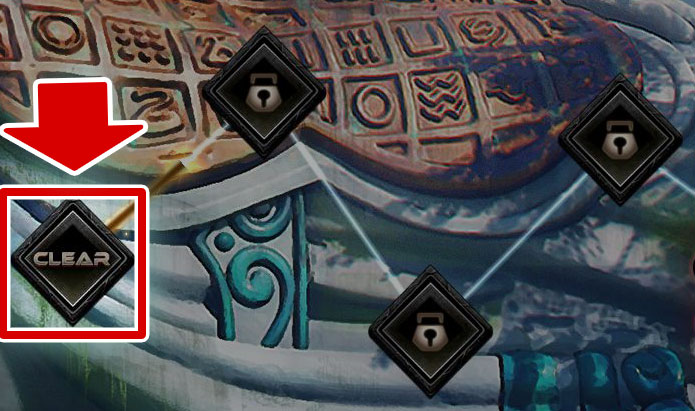 |
2. Challenge and clear open tiles. |
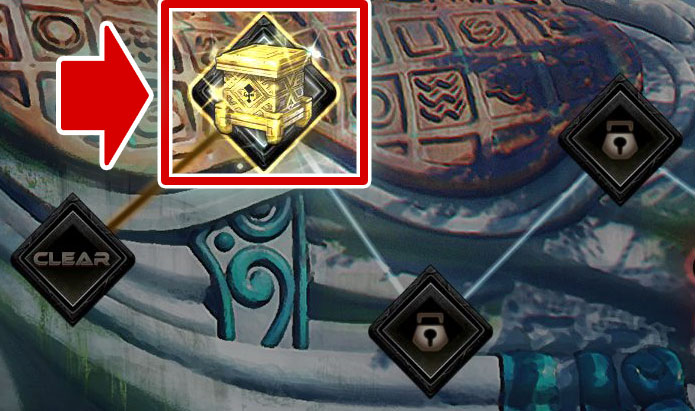 |
3. The tile that was previously locked will now be open! |
■ Tile Types
Now that you know how to traverse the tiles, I’m going to teach you the tile types.
Now that you know how to traverse the tiles, I’m going to teach you the tile types.
 |
Battle Tiles
|
These tiles activate an enemy battle.
These enemies are especially strong, so be careful! Win the battle to open the tile and get a reward.
In addition, one of the following will occur randomly:
* I’ll explain more about Relics later, so don’t worry!- A Relic Draw from your Relic deck. - A Temporary Relic Draw. |
 |
Treasure Tiles
|
You can get various rewards from these. Once you claim your reward, the tile will be cleared. |
 |
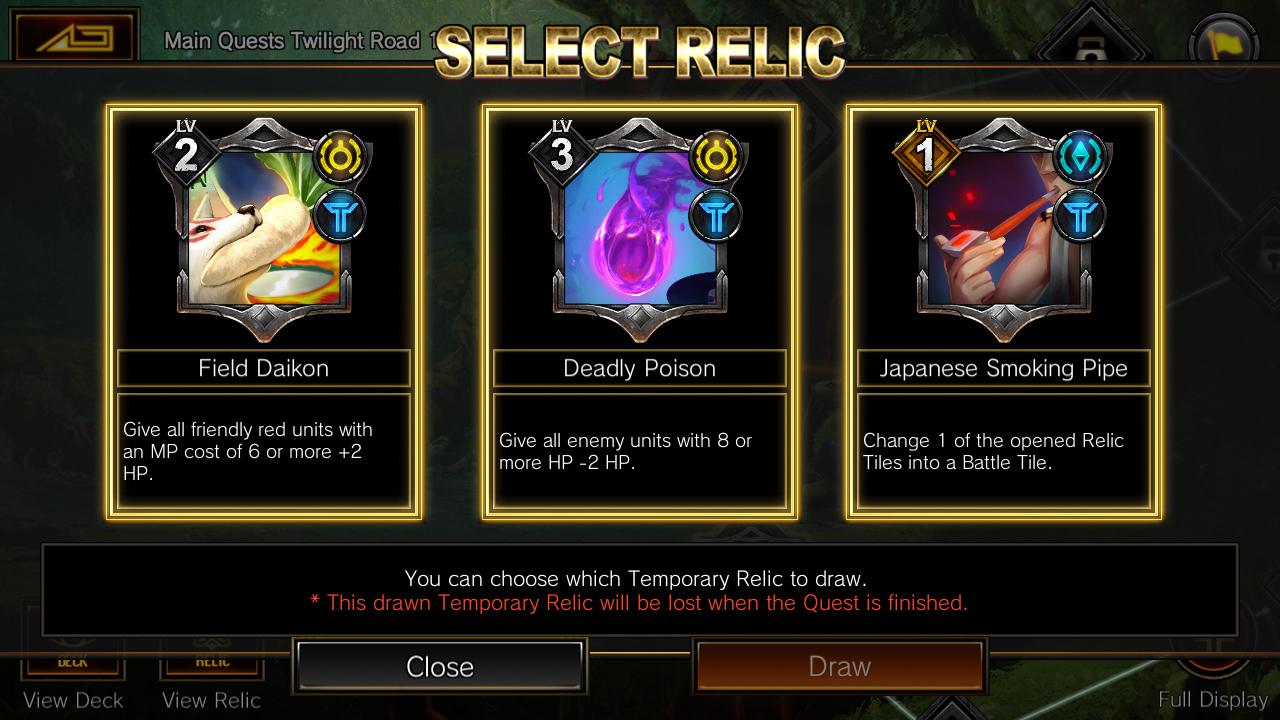
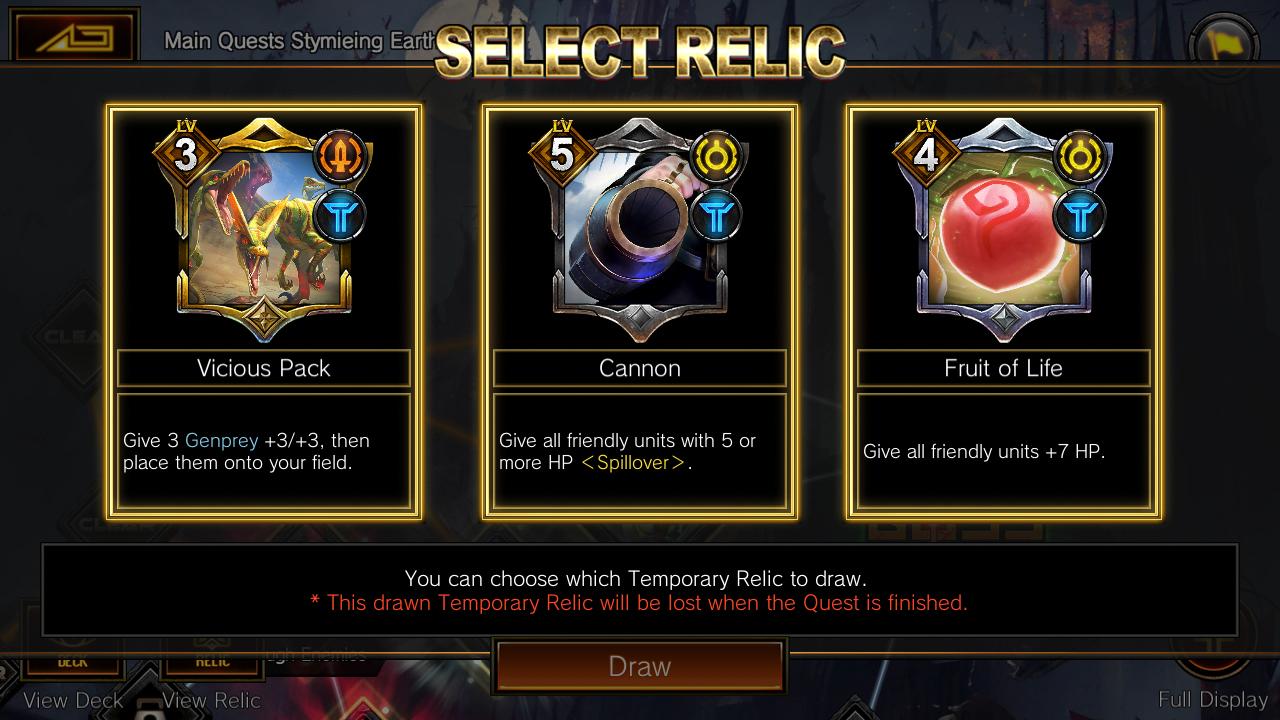
Relic Tiles
|
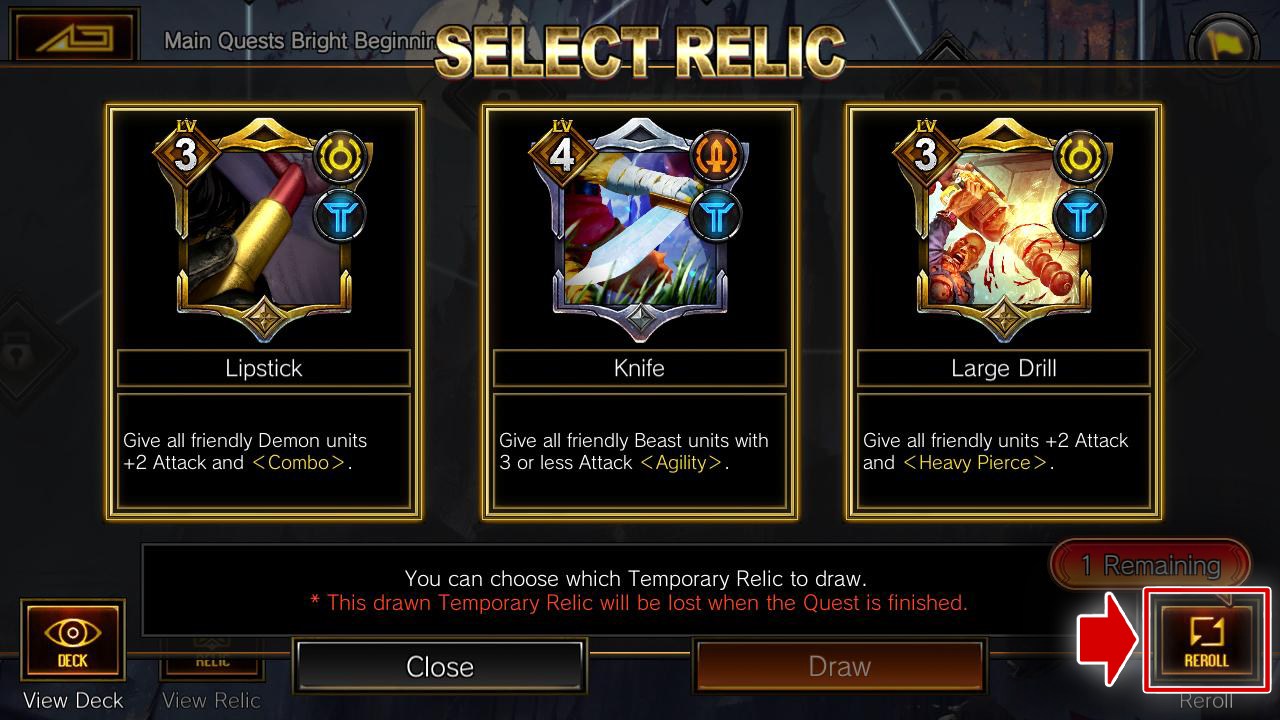
You can draw one Temporary Relic of your choice from the three types.
* Like I said before, I’ll explain more about Relics later!Once you draw your Temporary Relic, the tile will be cleared. |
 |
Recycling Tiles
|
You can exchange one of your owned Relics for a new Temporary Relic.
Once you exchange a Relic or skip, the tile will be cleared. |
 |
Message Tile
|
Displays messages such as hints.
Clear by selecting "Continue" after reading all the messages. |
 |
Boss Tiles
|
These tiles activate a boss battle.
And if there’s another stage, you’ll be able to draw for a Temporary Relic, too!Defeat the boss and the stage will be cleared! You can also get rewards. |
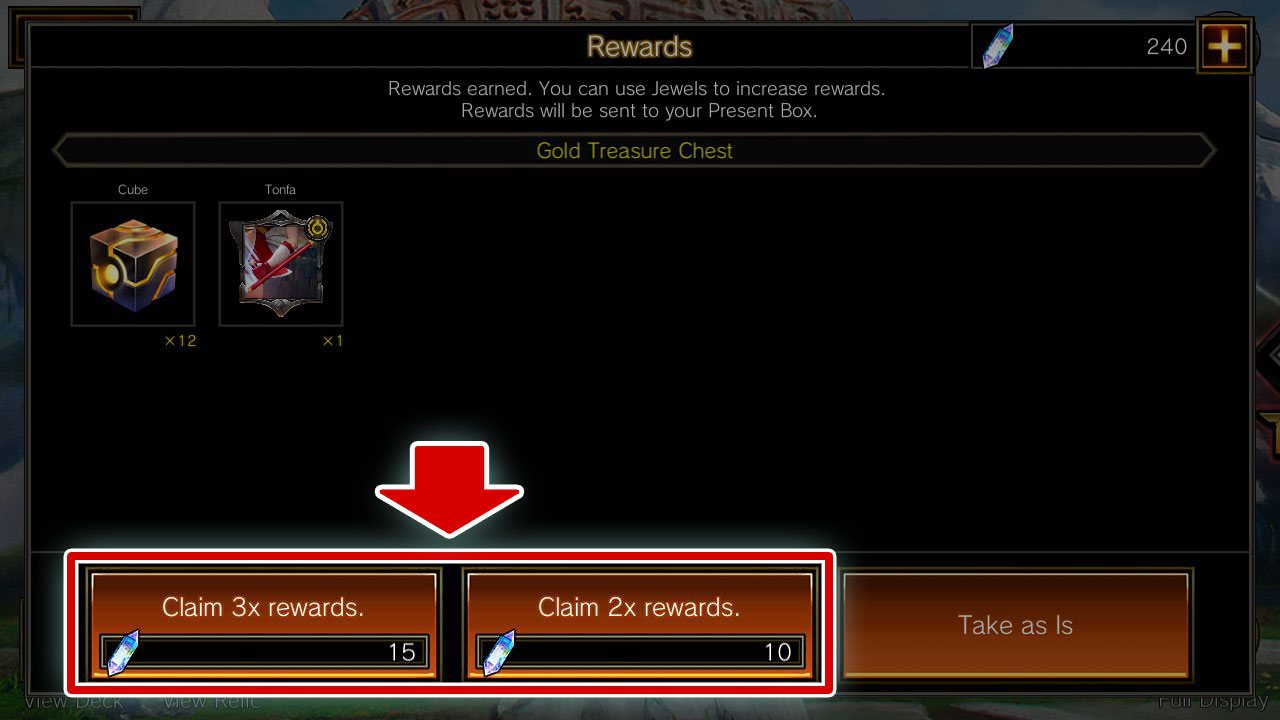
A Tidbit: Rewards Can Be Increased?!
You can increase the amount of rewards obtained from Battle Tiles and Treasure Tiles with Jewels!
To increase your rewards, select the “Claim 3x rewards.” or “Claim 2x rewards.” button on the Rewards screen!
You can increase the amount of rewards obtained from Battle Tiles and Treasure Tiles with Jewels!
To increase your rewards, select the “Claim 3x rewards.” or “Claim 2x rewards.” button on the Rewards screen!
Relics, an Adventure-Exclusive Item
What are Relics?
We can finally talk about Relics!
Relics are Adventure-exclusive items that have many different effects!
Relics are Adventure-exclusive items that have many different effects!
For example, they can have effects during battle like strengthening a unit or adding a specific card to your EX Pocket, as well as effects on the map like changing tiles into Treasure Tiles or clearing an uncleared tile!
Utilizing Relics is key to clearing maps!
For now, let me explain the basics.
For now, let me explain the basics.
Relic Fundamentals
 |
1. - Embark on maps with the Relics that you want to use. - Obtain Relics from tiles. |
 |
2. Use Relics on the map. |
 |
3. Relic effects make tackling battles fast and easy. ♪ |
Are you starting to understand what Relics are now?
Still, I’ll explain a little more!
Still, I’ll explain a little more!
That said, there are many elements to Relics, so I’d recommend using some first and then reading more if you have any questions afterward.
How You Use Relics Depends on What Kind It Is!
I briefly explained earlier how to use Relics, but depending on the Relic, there are different conditions that are needed before they can be used on the map!
I’ll explain that now.
I’ll explain that now.
■ There Are Two Main Patterns to Using Relics on the Map!
As explained in section 1 under “Relic Fundamentals,” there are two patterns to using Relics.
- Embark on maps with the Relics that you want to use.
- Obtain Relics from tiles.
As explained in section 1 under “Relic Fundamentals,” there are two patterns to using Relics.
- Embark on maps with the Relics that you want to use.
- Obtain Relics from tiles.
Your Relic deck consists of the Relics that you bring to the map.
The Relics obtained from tiles are called Temporary Relic.
The Relics obtained from tiles are called Temporary Relic.
 |
 |
Temporary Relic have the icon shown above.
Temporary Relic disappear when you clear a map or forfeit.
Temporary Relic disappear when you clear a map or forfeit.
■ You Must Draw Relics to Use Them!
Even if you bring your Relic deck with you to the map, that doesn’t mean you can use them all right away!
If you want to use your Relics, you need to draw for them!
Even if you bring your Relic deck with you to the map, that doesn’t mean you can use them all right away!
If you want to use your Relics, you need to draw for them!
I bet you’re wondering what’s the difference between a Relic Draw and drawing a card, aren’t you?
Adding a Relic to your Owned Relics is called a Relic Draw.
Adding a Relic to your Owned Relics is called a Relic Draw.
Thinking of “Owned Relics” as “your hand” might make this a little easier to visualize.
 |
Check out your Owned Relics by clicking “View Relic” on the map. You won’t see anything in your Owned Relics in the beginning! |
Now I’ll explain how to draw.
There are four ways to draw Relics.
There are four ways to draw Relics.
 |
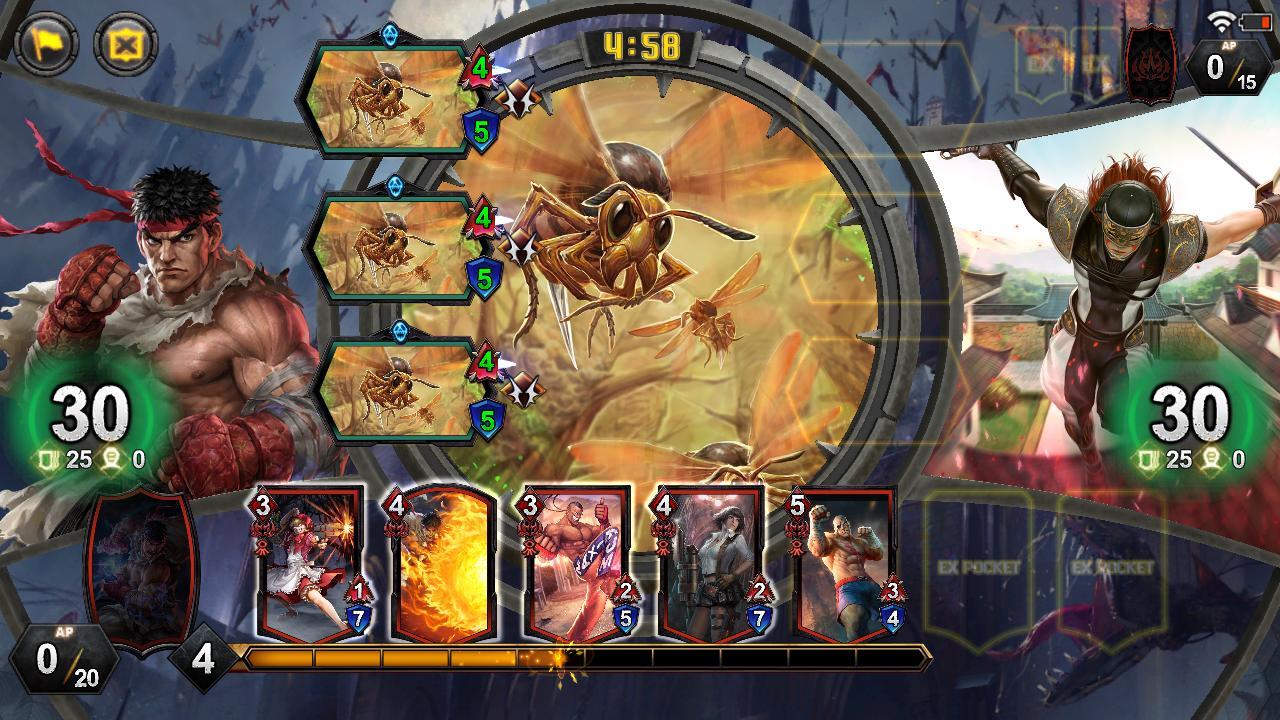
Drawing from Battle Tiles When you win your battle, the one of the following will occur randomly: - A Relic Draw from your Relic deck. - Obtaining a Temporary Relic from the tile (Temporary Relic Draw) |
 |
Drawing from Relic Tiles You can draw one Temporary Relic of your choice from the three types! |
 |
Drawing from Recycling Tiles Put one of your Owned Relics up for exchange, and in its place you can draw one Temporary Relic of your choice from the three displayed! |
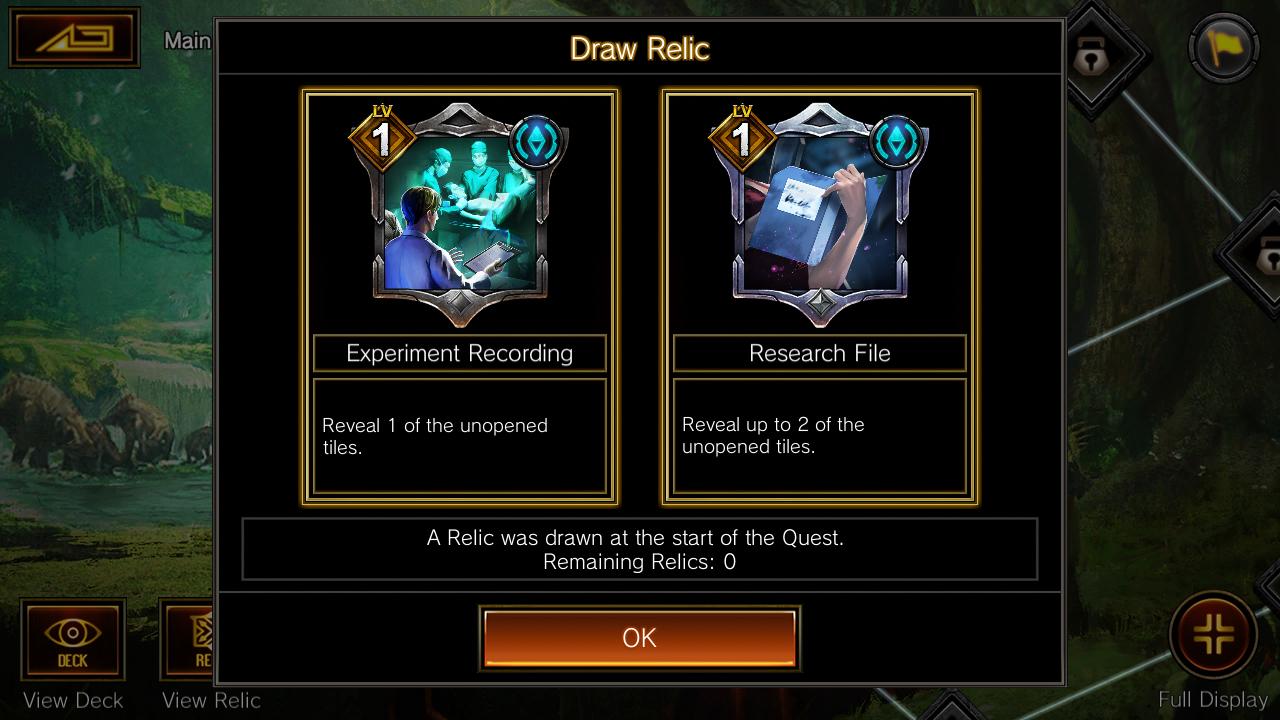 |
Drawing at the Start On some maps you can draw multiple cards from your Relic deck at the beginning! |
Here's a tip: Try to "Reroll"!
All Temporary Relics you draw on Relic Tiles and Recycling Tiles are of maximum level!
You can power up a deck by choosing the Temporary Relic with an effect just right for it, but sometimes, you just can't seem to get the Temporary Relic you need.
That's when you press the "Reroll" button on the selection screen!
This way, you can reset the Temporary Relic selection once per tile!
Now that we’ve drawn our Relics, let’s use them on the map!
But wait! Relics, depending on their type, have different effects and different places to use them!
But wait! Relics, depending on their type, have different effects and different places to use them!
■ There Are Three Types of Relics! Can You Remember Them All?
Relics can be divided into three types according to their effects and usage.
I’ve included examples of Relic effects at the end of this page, so check them out if you’d like to!
Relics can be divided into three types according to their effects and usage.
I’ve included examples of Relic effects at the end of this page, so check them out if you’d like to!
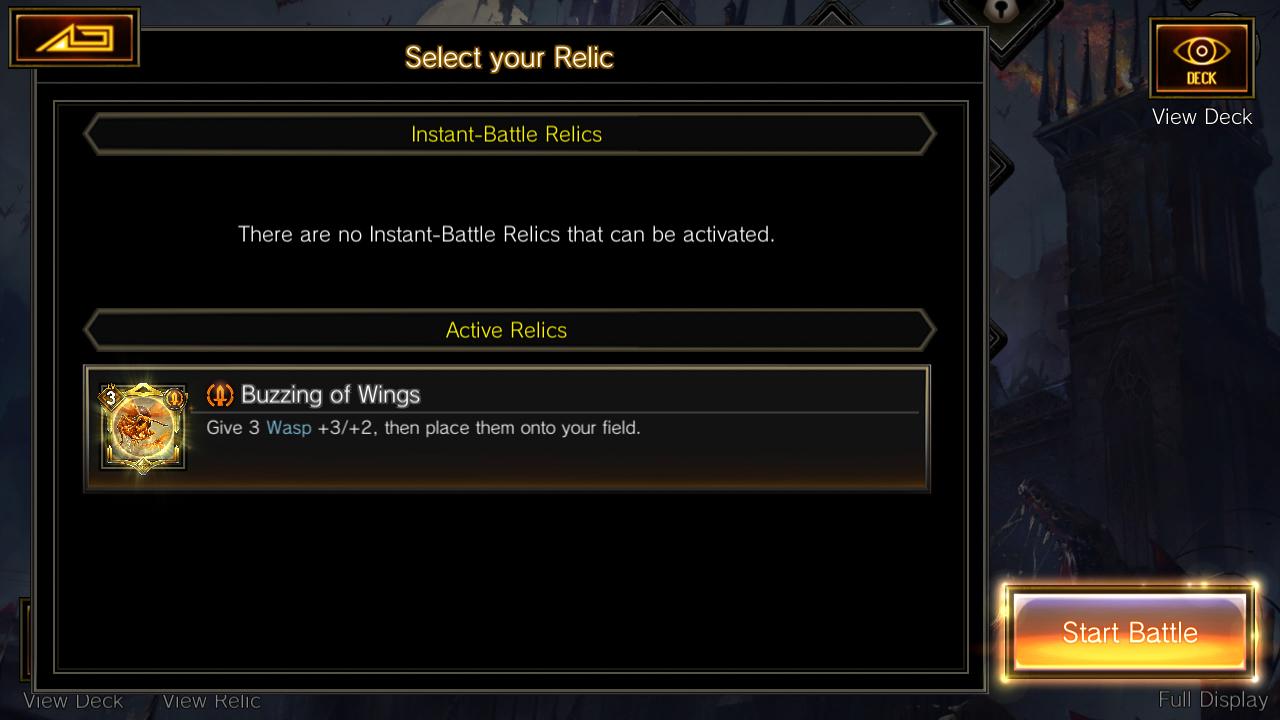
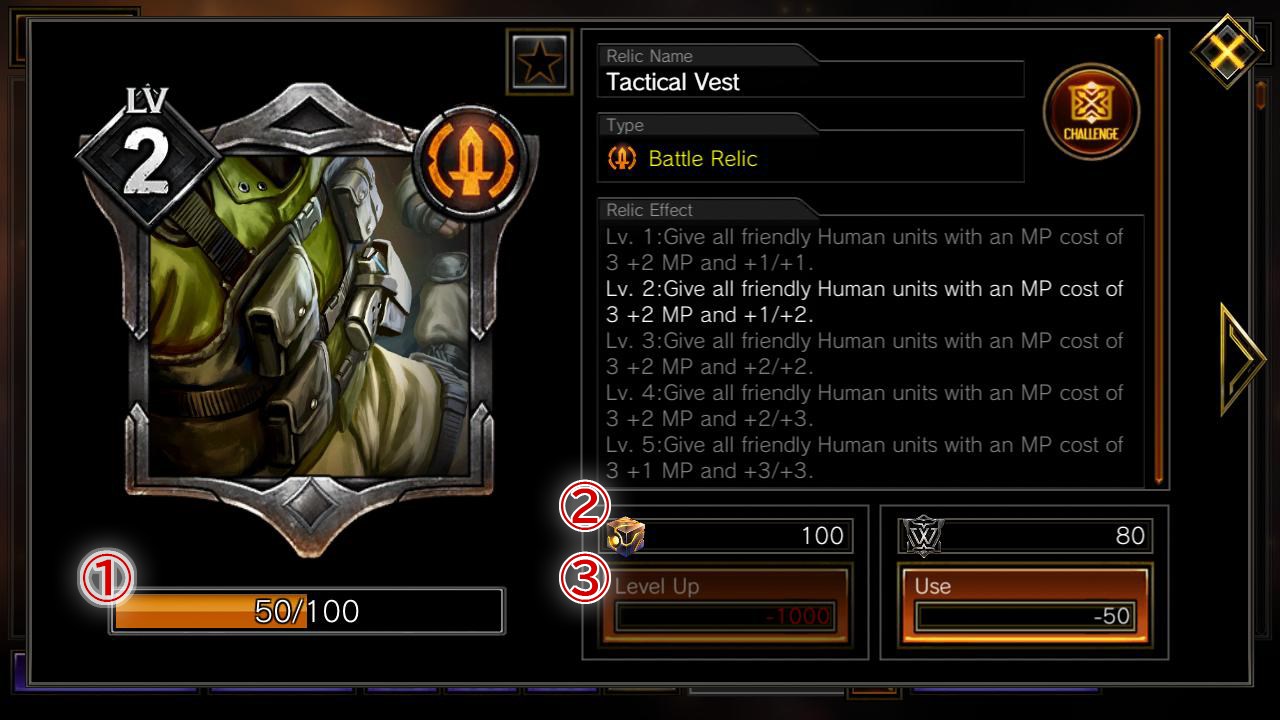
■ Battle Relics
These Relics are effective in battle and grant effects such as strengthening a unit.
Battle Relics take effect right after they are drawn.
Their effects last throughout your map attempt.
Battle Relics take effect right after they are drawn.
Their effects last throughout your map attempt.
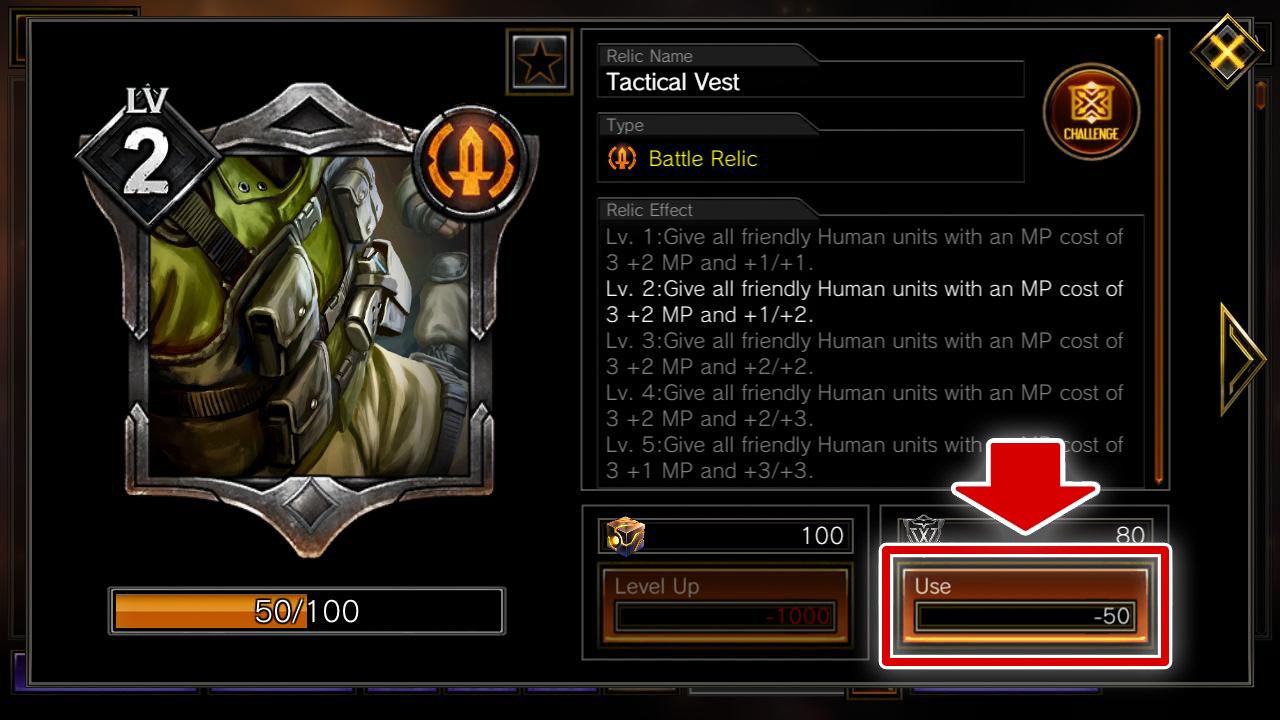
■ Instant Battle Relics
Like Battle Relics, these Relics are very effective in battle.
The difference is that these Relics only activate once.
The difference is that these Relics only activate once.
Instant Battle Relics can be used as follows.
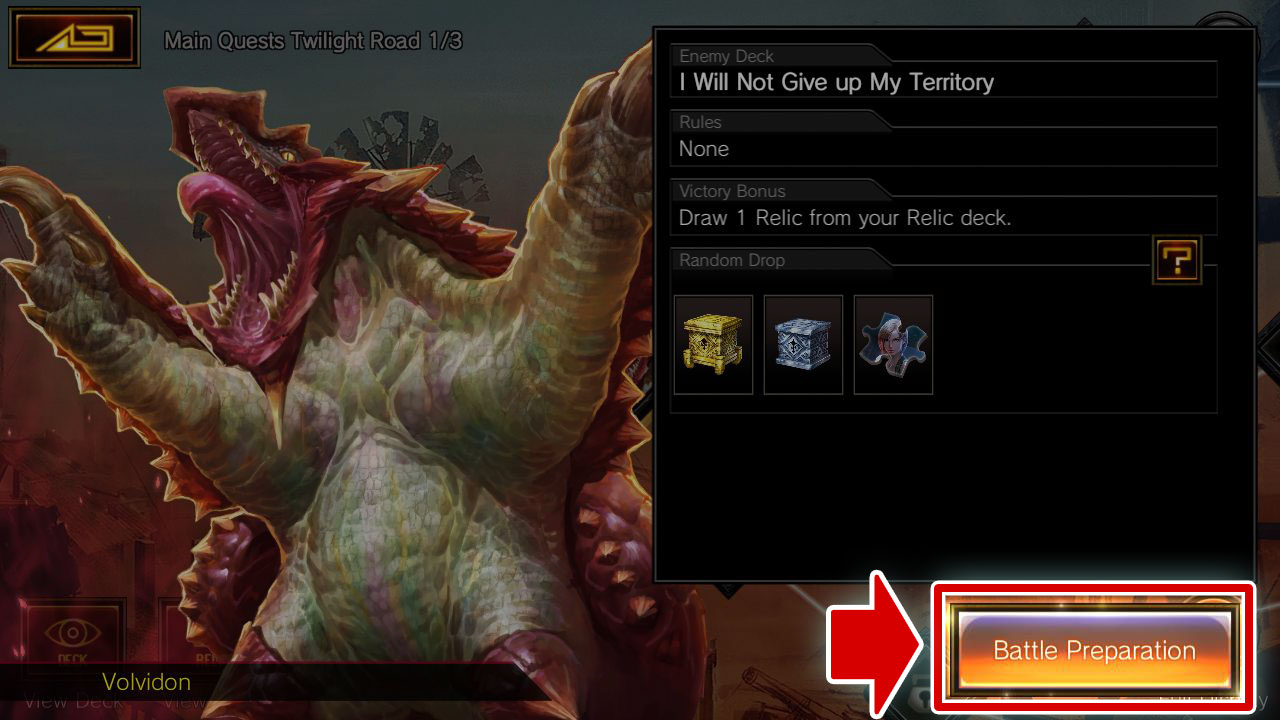 |
Select a Battle Tile on the map and go to “Battle Preparation.” |
 |
Select the Instant Battle Relic you want to activate with the “Use” button and you’re ready! |
 |
When you enter a battle, the Instant Battle Relic’s effect will activate. And once the battle is over, so is its effect! |
■ Map Relic
These Relics affect the map and have effects like altering tile types.
They are only usable once.
They are only usable once.
Map Relics can be used as follows.
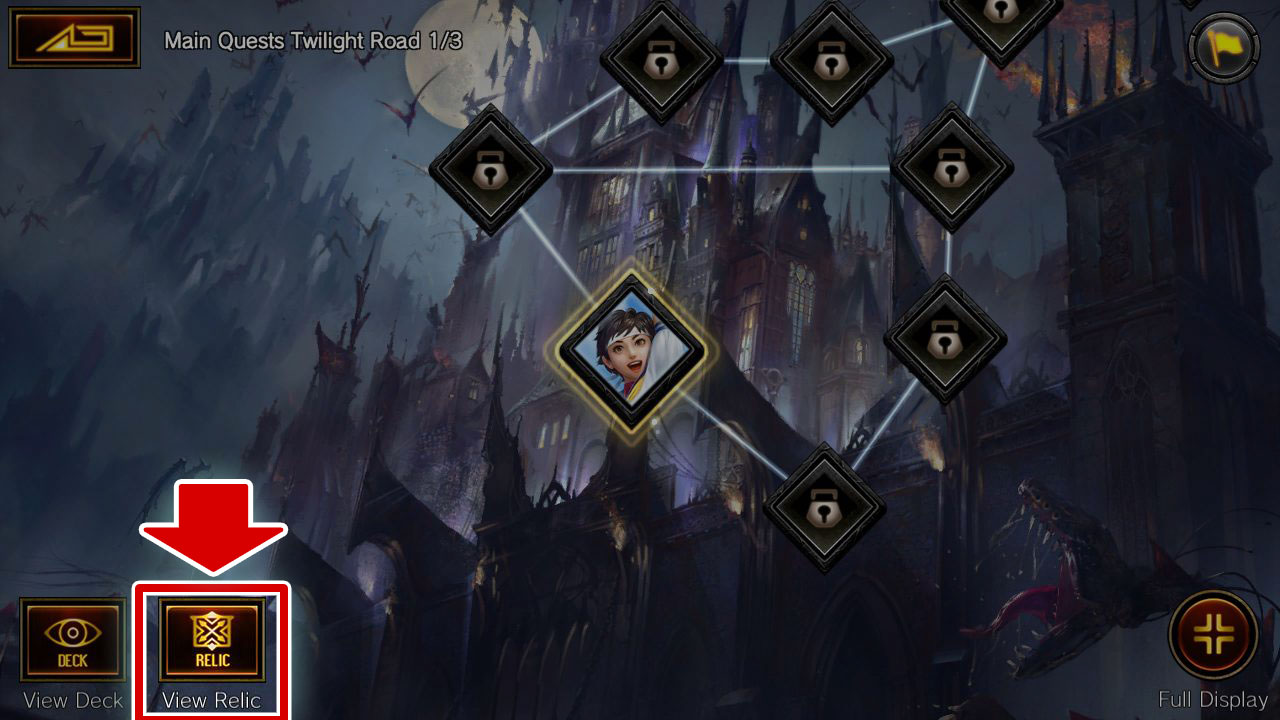 |
On the map select “View Relic.” |
 |
Select the Map Relic you want to use from your Owned Relics with the “Use” button to activate its effect! |
I think I’m finished talking about Relic types and how to use them.
Now we can finally begin preparations.
Now we can finally begin preparations.
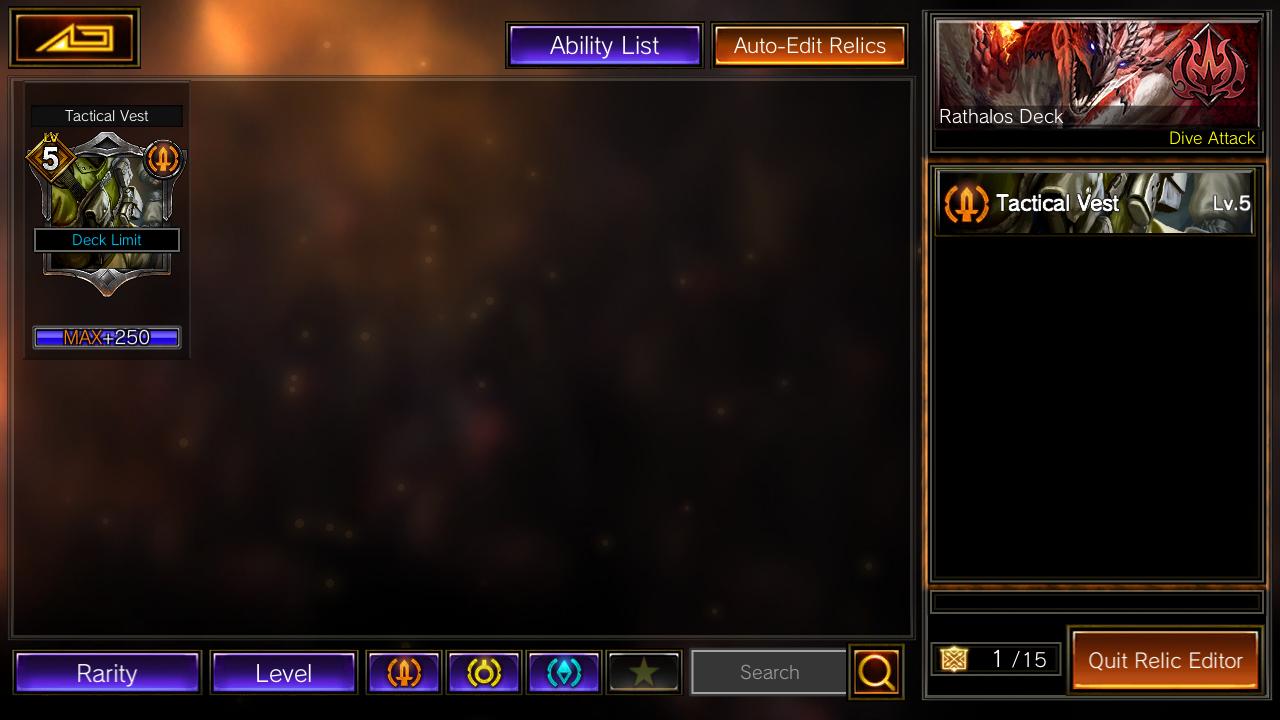
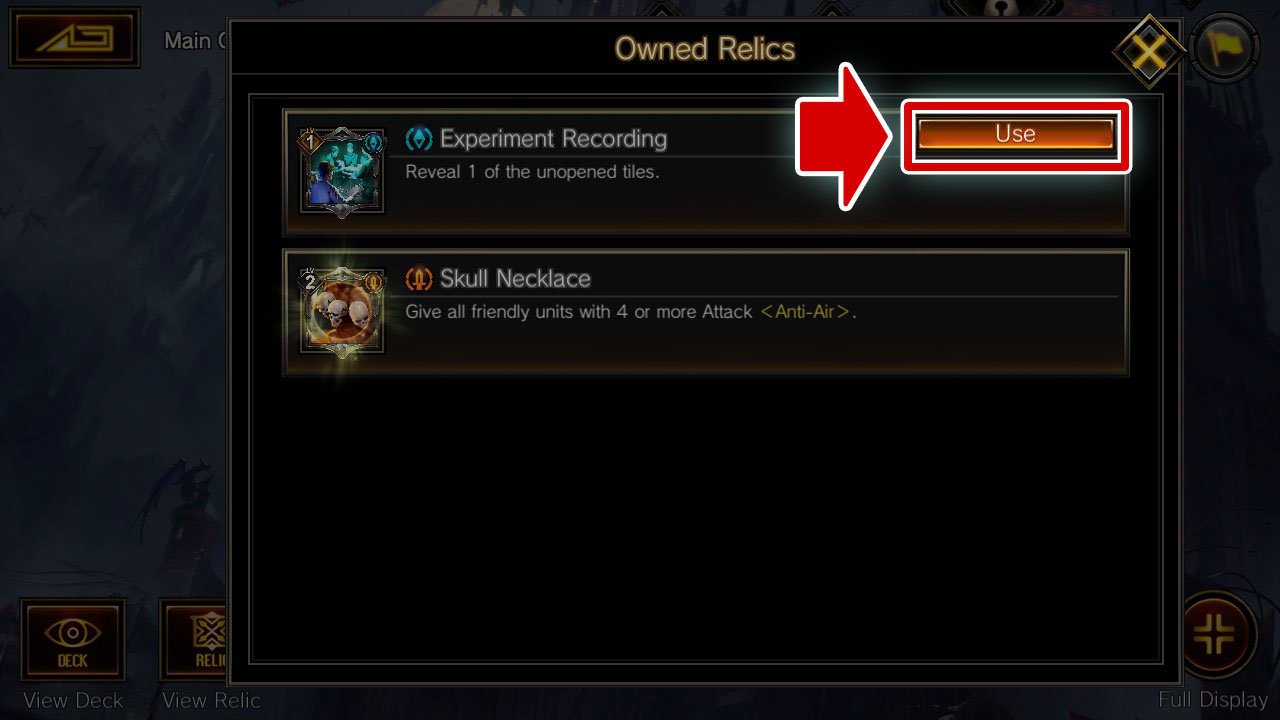
Prepare the Relic Deck You’re Bringing into the Map!
Now that I’ve finished talking about Relics, next up is an explanation on how to bring Relics with you to a map.
You can bring up to 15 Relics into a map.
You can set up the Relics that you want to bring by following the steps below.
You can set up the Relics that you want to bring by following the steps below.
 |
1. Select “Edit Deck/Relics” from Adventure Top. |
 |
2. The Relics you bring are set on a per-deck basis. Choose the deck you want to set Relics for. |
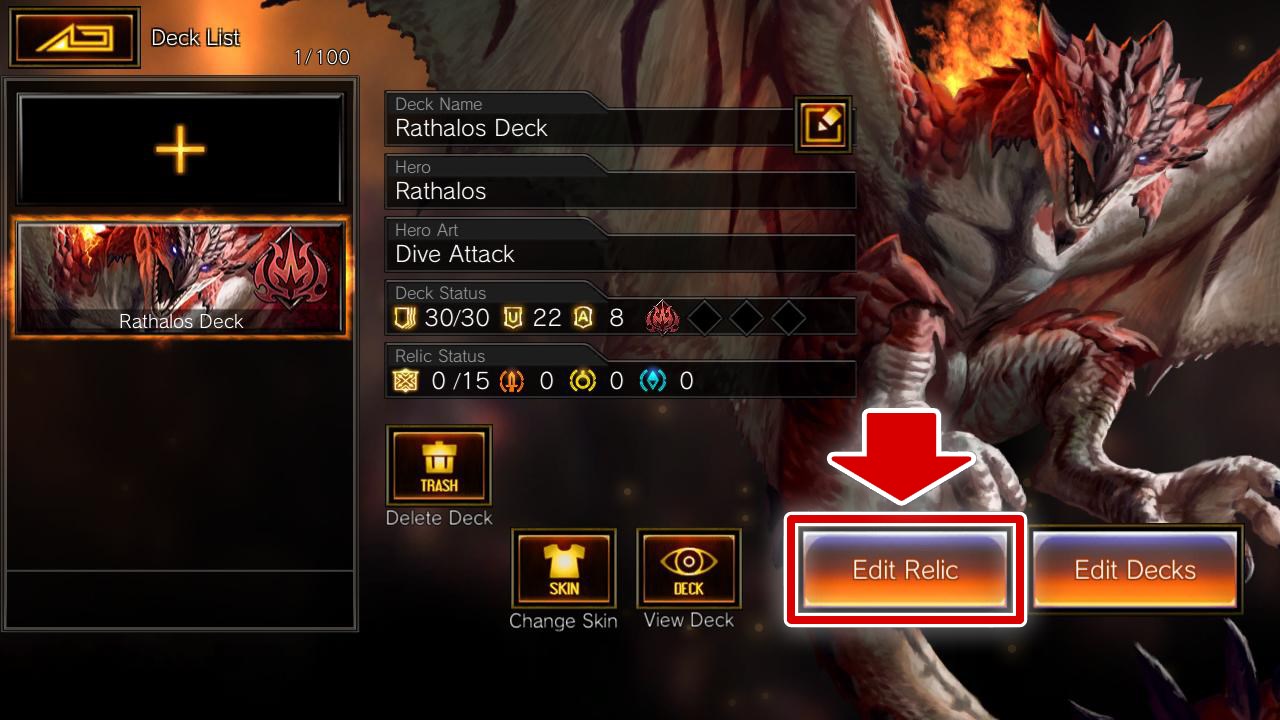 |
3. Select “Edit Relic” and you’ll move to the editing screen. |
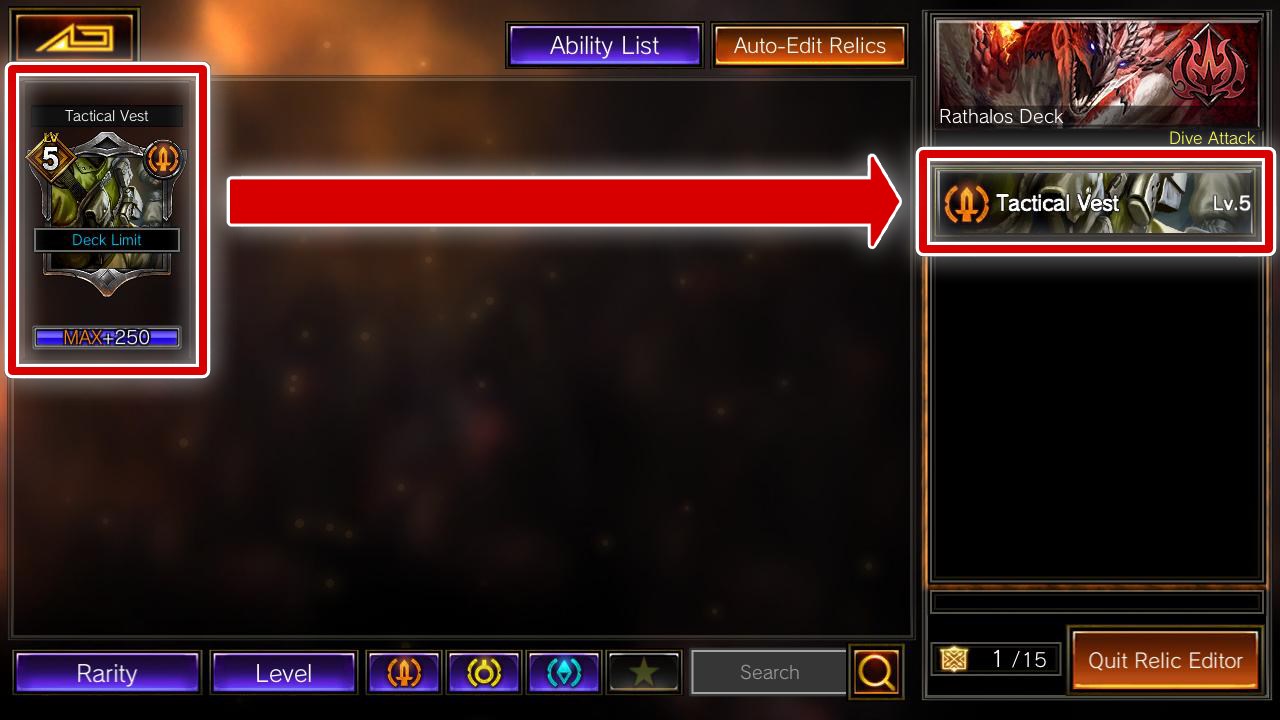 |
4. Move the Relic you want to use to the box on the right. |
 |
5. When you are done moving your Relics, select “Quit Relic Editor.” Ta-dah, your Relic deck is complete! |
A Tidbit: Set your most-used Relics as Favorites!
Finding the Relic you want to edit whenever making a deck is tough work!
At such times, you can set Relics as Favorites via the “★” button on the Relic Details screen!
Finding the Relic you want to edit whenever making a deck is tough work!
At such times, you can set Relics as Favorites via the “★” button on the Relic Details screen!
You can view your Favorited Relics with the “★” button on the Relic Details screen. Set your most-used Relics as Favorites so you can find them quickly!

You know Relic types and how to use them. You even know about Relic decks. You’re now a Relic master! Or are you?
Actually, there’s one more thing I need to teach you about Relics.
Actually, there’s one more thing I need to teach you about Relics.
Strengthen Your Relics and Create All Sorts of Strategies!
Guess what? You can strengthen Relics!
And that’s what I’m going to talk about next.
And that’s what I’m going to talk about next.
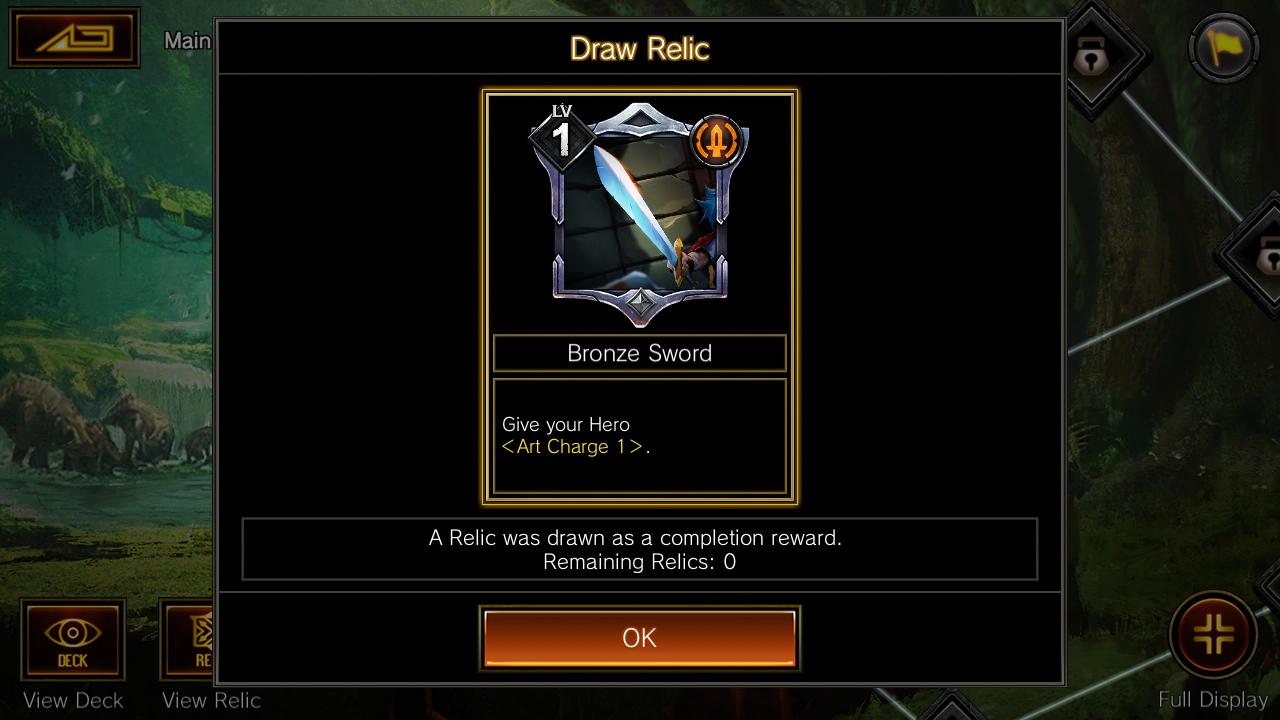
■ Relics Gets Stronger with Each Level!
Level up your Relics to boost the strength of their effects!
Level up your Relics to boost the strength of their effects!
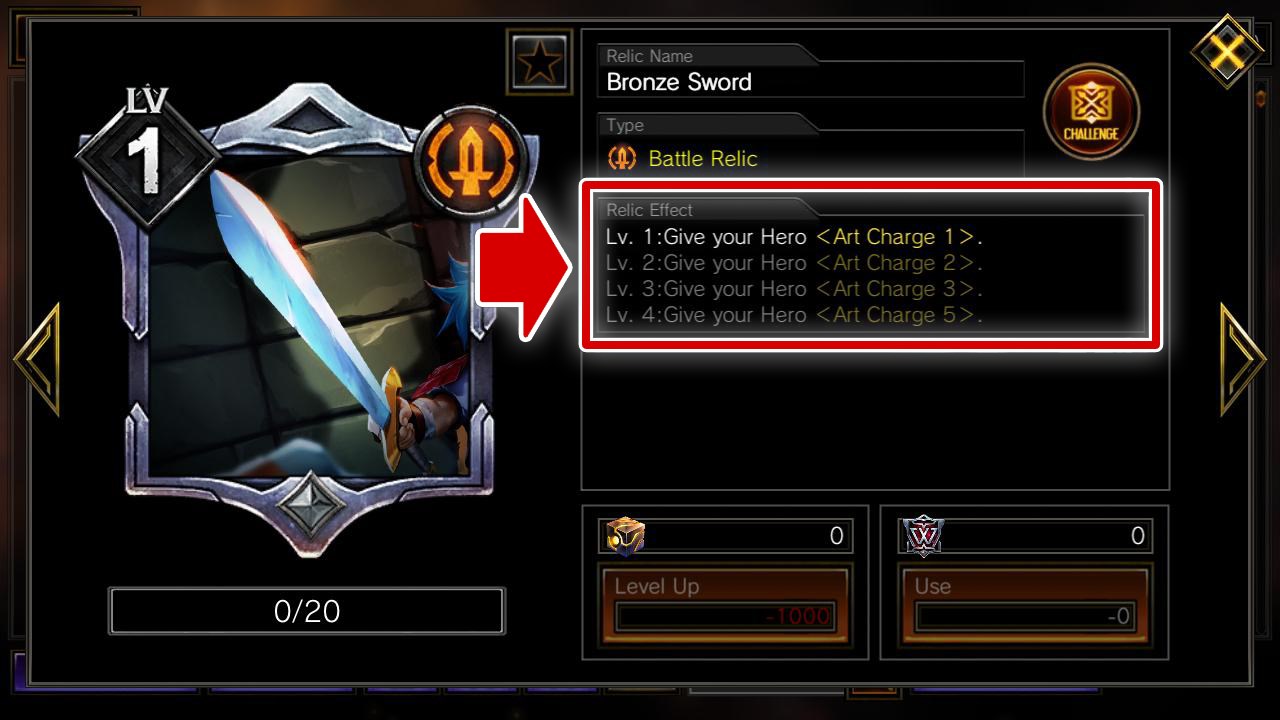 |
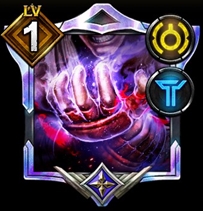
For example, leveling up “Bronze Sword” will increase the amount of Art Points you get at the beginning of a battle! |
Now you’re aware that leveling up a Relic increases their effect’s power.
Next, I’ll explain how to go about raising a Relic’s level.
Next, I’ll explain how to go about raising a Relic’s level.
■ Raise Your Relic’s Level!
A Relic will go up in level by spending materials.
First, let’s take a look at the basic process.
A Relic will go up in level by spending materials.
First, let’s take a look at the basic process.
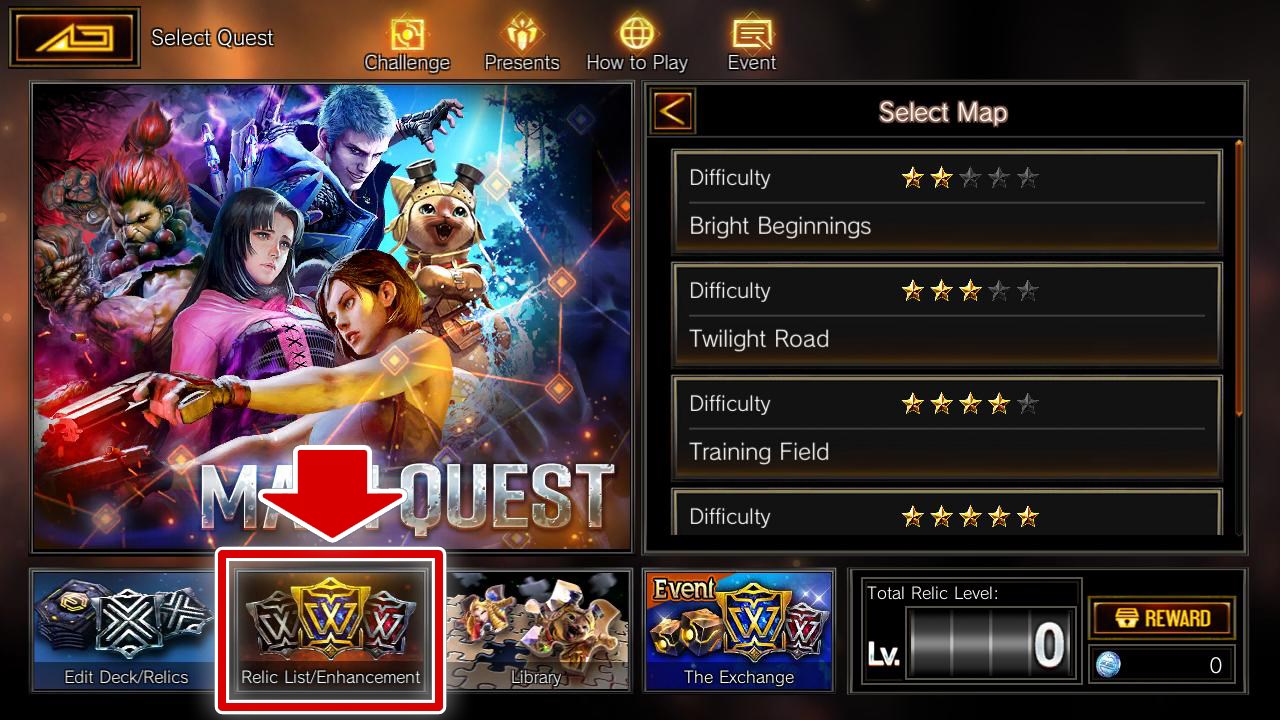 |
1. Select “Relic List/Enhancement” from Adventure Top. |
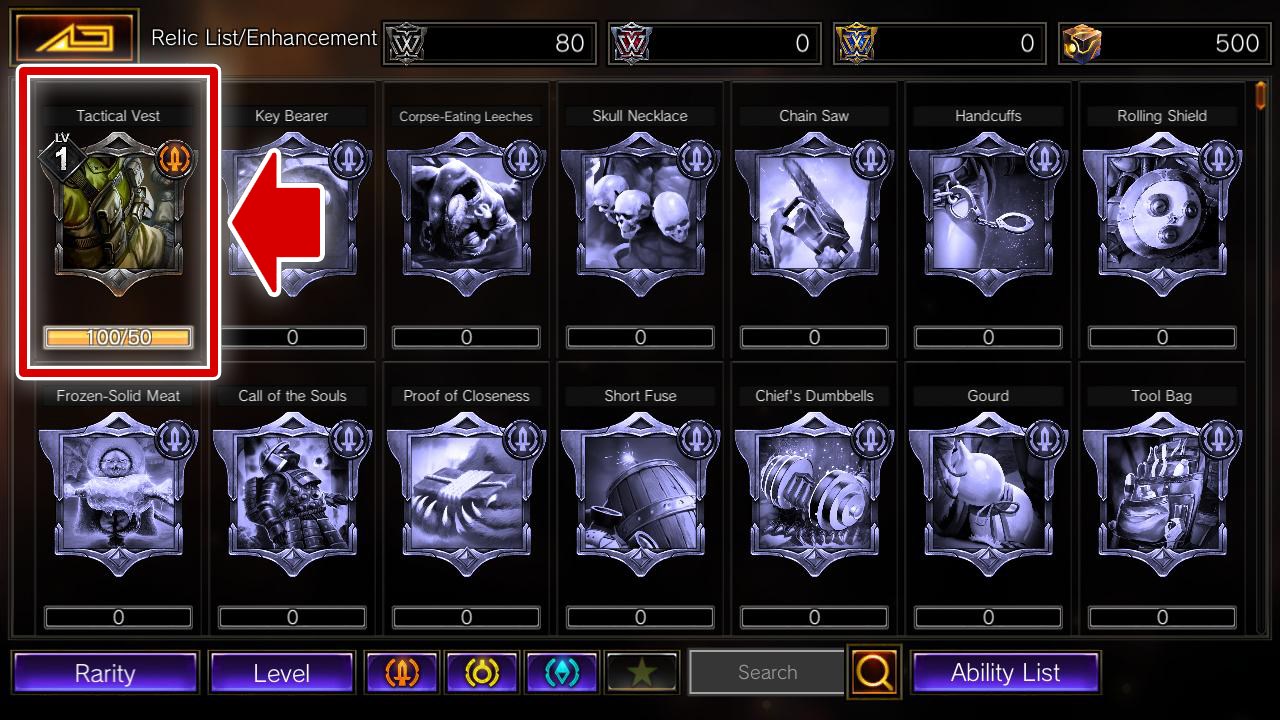 |
2. When you select a Relic you want to level up, you will be taken to the Relic Details screen. |
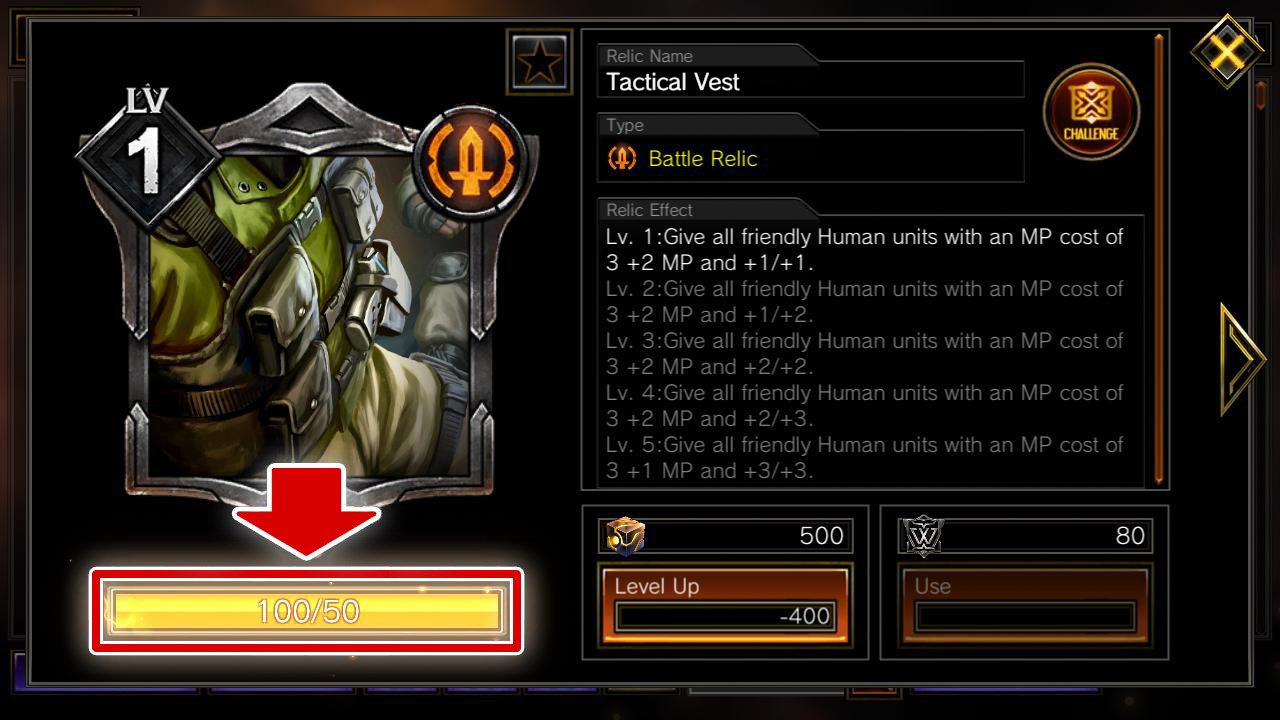 |
3. The bar in the lower left corner will light up when you have all the necessary materials to raise its level. I’ll explain more about materials later. |
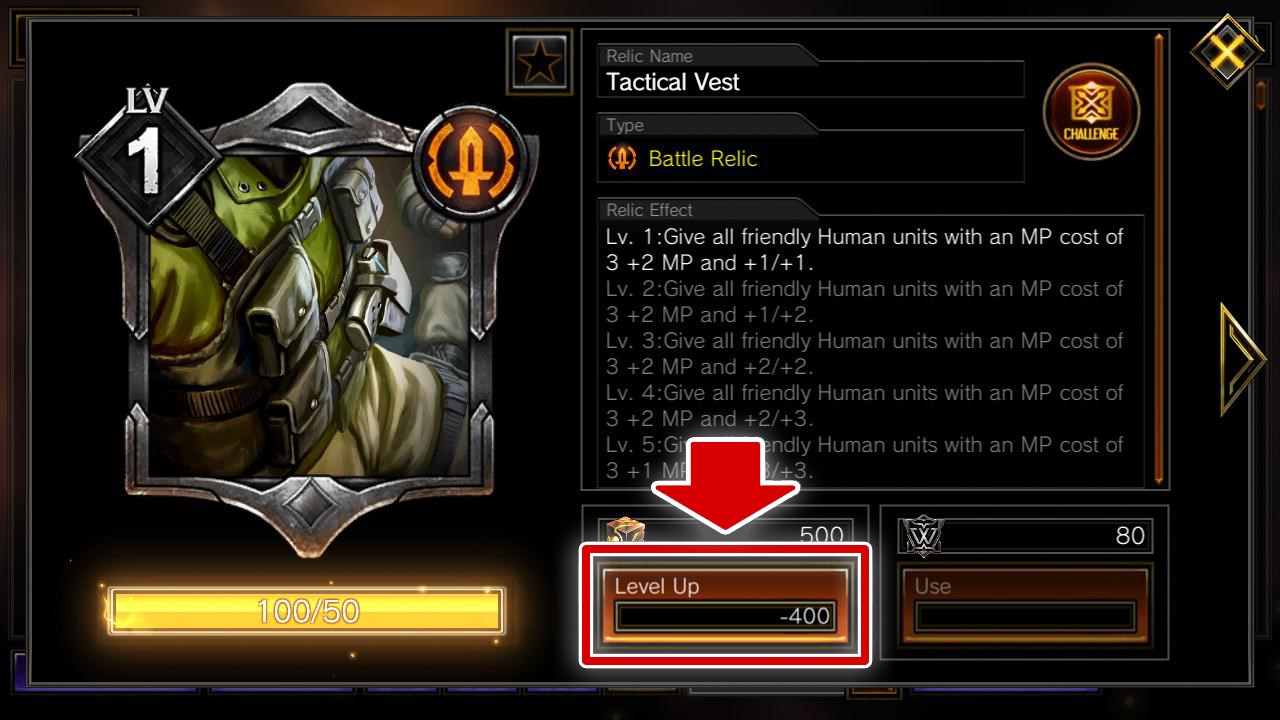 |
4. Select “Level Up.” |
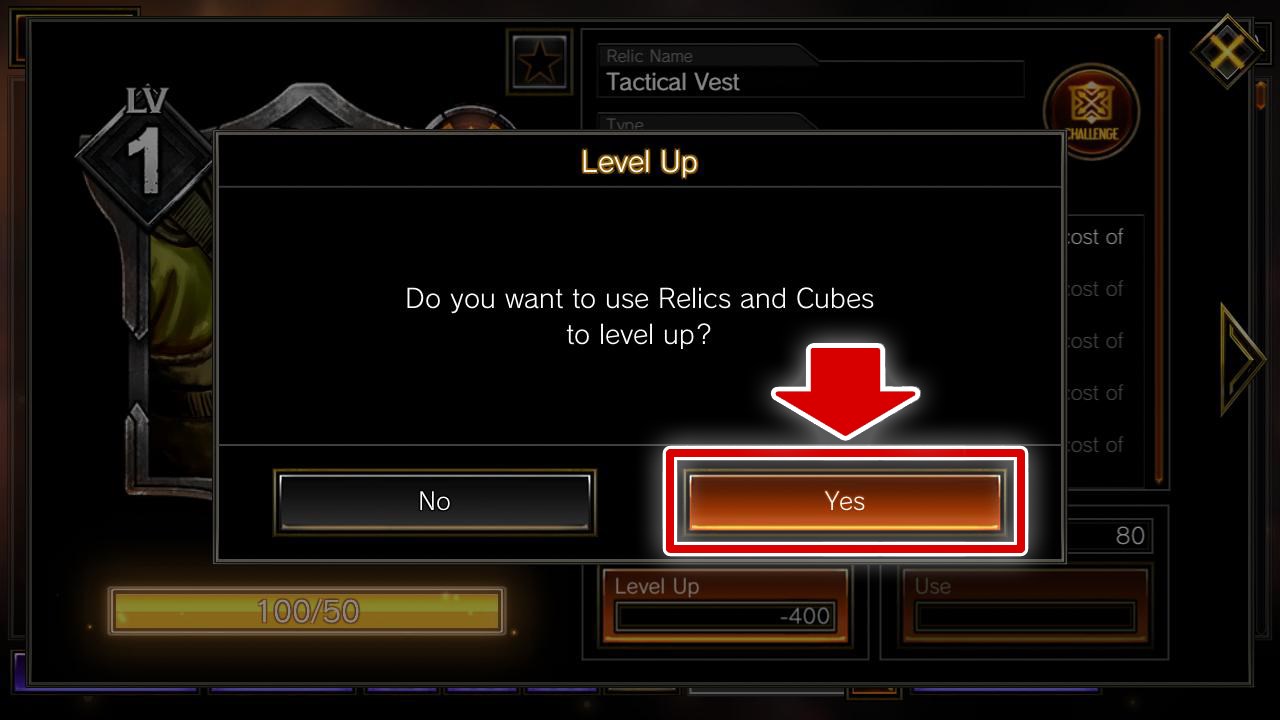 |
5. Once you tap “Yes” on the confirmation screen, your Relic will be leveled up! A higher level means a stronger effect! |
Do you get how to raise a Relic’s level now?
Next is an explanation on the materials used for leveling up.
Next is an explanation on the materials used for leveling up.
■ Collect Materials Needed to Level Up!
To level up a Relic, you need the following two materials.
Let me explain with the image below.
To level up a Relic, you need the following two materials.
Let me explain with the image below.
1. Identical Relics
You’ll need a certain amount of the same Relic that you want to level up.
You can see your number of currently owned Relics with the actions below.
You’ll need a certain amount of the same Relic that you want to level up.
You can see your number of currently owned Relics with the actions below.
(Amount currently owned) / (Required amount)
2. 3. Cubes
You could call this “money” that’s used to pay for leveling up.
Cubes are obtained as rewards from Battle Tiles and Treasure Tiles.
You could call this “money” that’s used to pay for leveling up.
Cubes are obtained as rewards from Battle Tiles and Treasure Tiles.
Number 2 displays the amount of Cubes currently owned.
Number 3 displays the required Cubes.
Number 3 displays the required Cubes.
That’s everything you need to know about required materials.
Be aware that the amount of materials required will vary depending on the level of the Relic you wish to level up.
Be aware that the amount of materials required will vary depending on the level of the Relic you wish to level up.
■ You Don’t Have Enough Materials to Level Up?!
You want to level up your Relics as fast as possible, but you don’t have any Relic copies! You don’t have any Cubes either! This is the case sometimes.
Just relax, for there is a way to get the materials you need.
You want to level up your Relics as fast as possible, but you don’t have any Relic copies! You don’t have any Cubes either! This is the case sometimes.
Just relax, for there is a way to get the materials you need.
■ Not Enough Relics
It can be hard collecting copies of the same Relic.
When that happens, use Wild Relics!
It can be hard collecting copies of the same Relic.
When that happens, use Wild Relics!
 |
If you select “Use” on the details screen of the Relic you want to level up, you can use a Wild Relic of the same rarity instead of the same Relic to make up the number of materials you need.
Wild Relics are obtained as rewards from Challenge. |
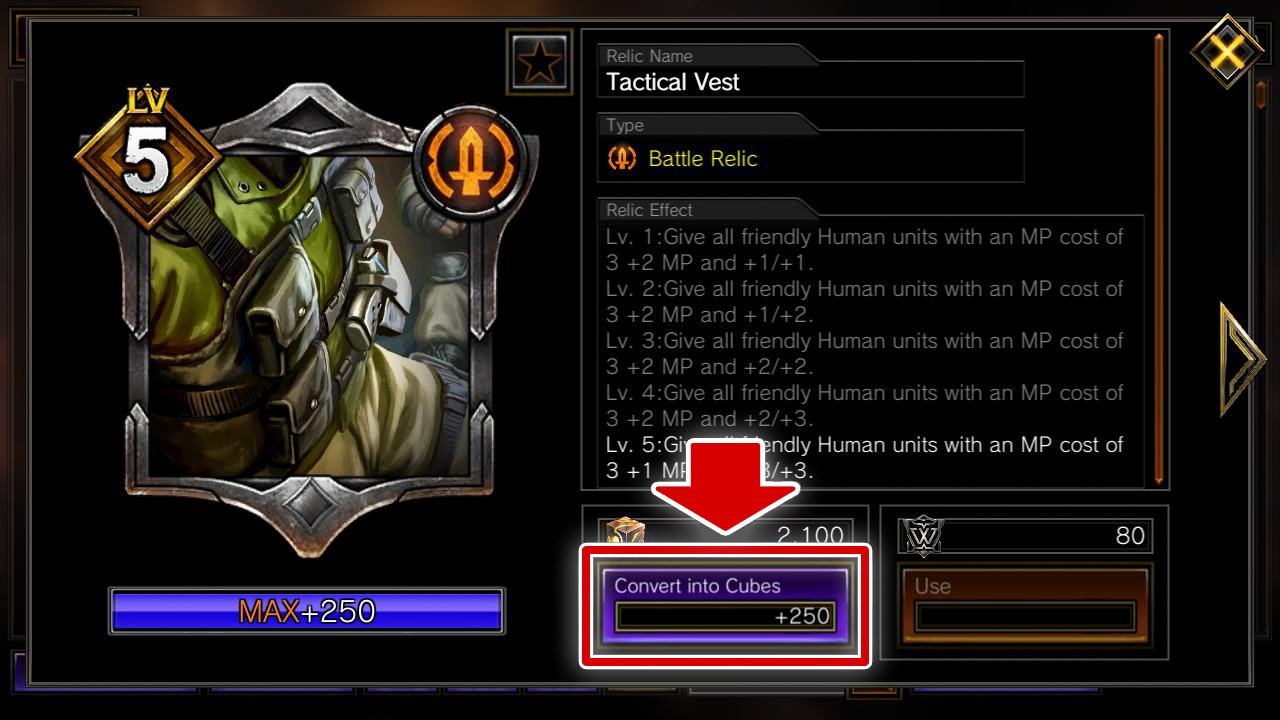
A Tidbit: You’ve Got Extra Relics!
As you strengthen more and more of your Relics, you”ll sometimes get a Relic that is the same as a Relic on its highest level.
When that happens select “Convert into Cubes” from the Relic details screen to convert the extra Relics into cubes!
As you strengthen more and more of your Relics, you”ll sometimes get a Relic that is the same as a Relic on its highest level.
When that happens select “Convert into Cubes” from the Relic details screen to convert the extra Relics into cubes!
That's it for the explanation on strengthening Relics.
That should cover everything to know about Relics... Huh? You can't equip the Relic you want, let alone strengthen it, if you don't even have one?
That should cover everything to know about Relics... Huh? You can't equip the Relic you want, let alone strengthen it, if you don't even have one?
In that case, just head to the Relic Challenges!
Obtain Relics in the Relic Challenges!
You can get Relics by accepting and completing Relic Challenges!
Follow the steps below to take up a Relic Challenge.
Follow the steps below to take up a Relic Challenge.
 |
1. Select "Edit Deck/Relics"or "Relic List/Enhancement" from Adventure Top. |
 |
2. Choose the Relic you want to obtain and move to the Relic Details screen. |
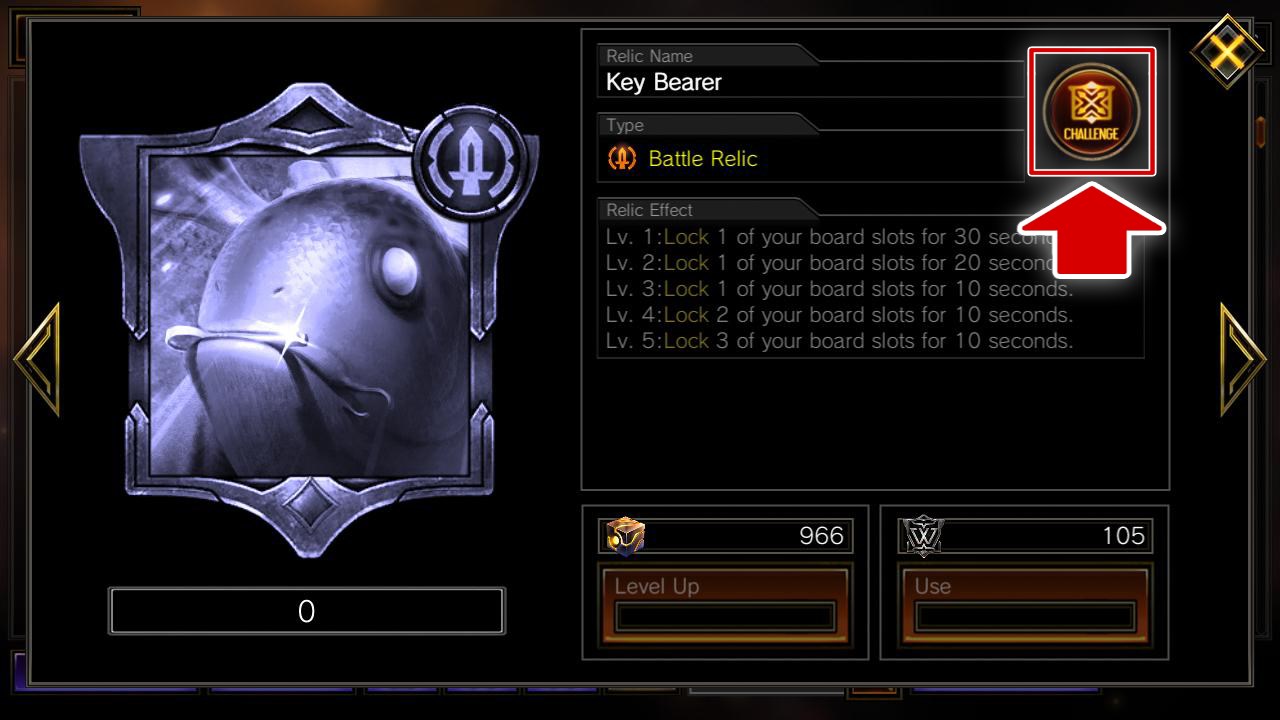 |
3. Select "CHALLENGE" in the top right of the screen to move to the Relic Challenge screen. |
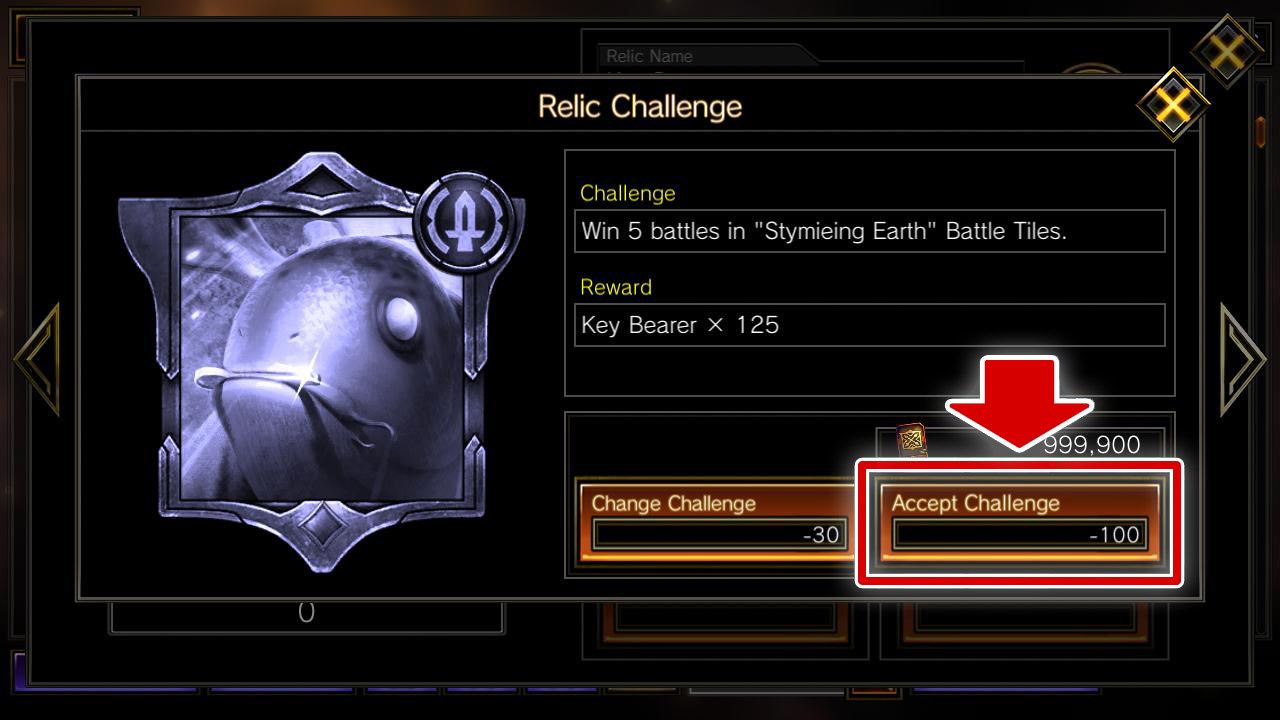 |
4. Select “Accept Challenge”. |
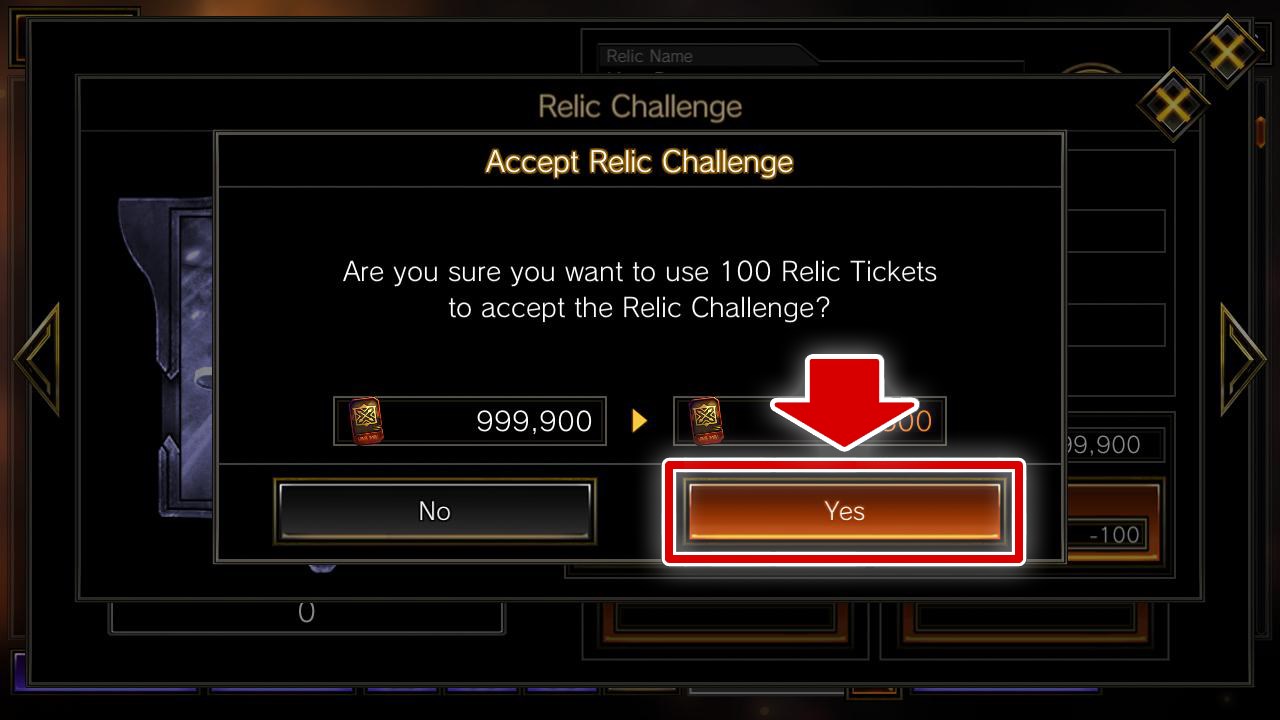 |
5. Select "Yes" to use Relic Tickets and accept the Challenge!
You can accept multiple Relic Challenges at the same time! You can obtain Relic Tickets from Campaign Challenges, which I'll explain after this!
Keep in mind that the number of Relic Tickets needed varies depending on the Relic! |
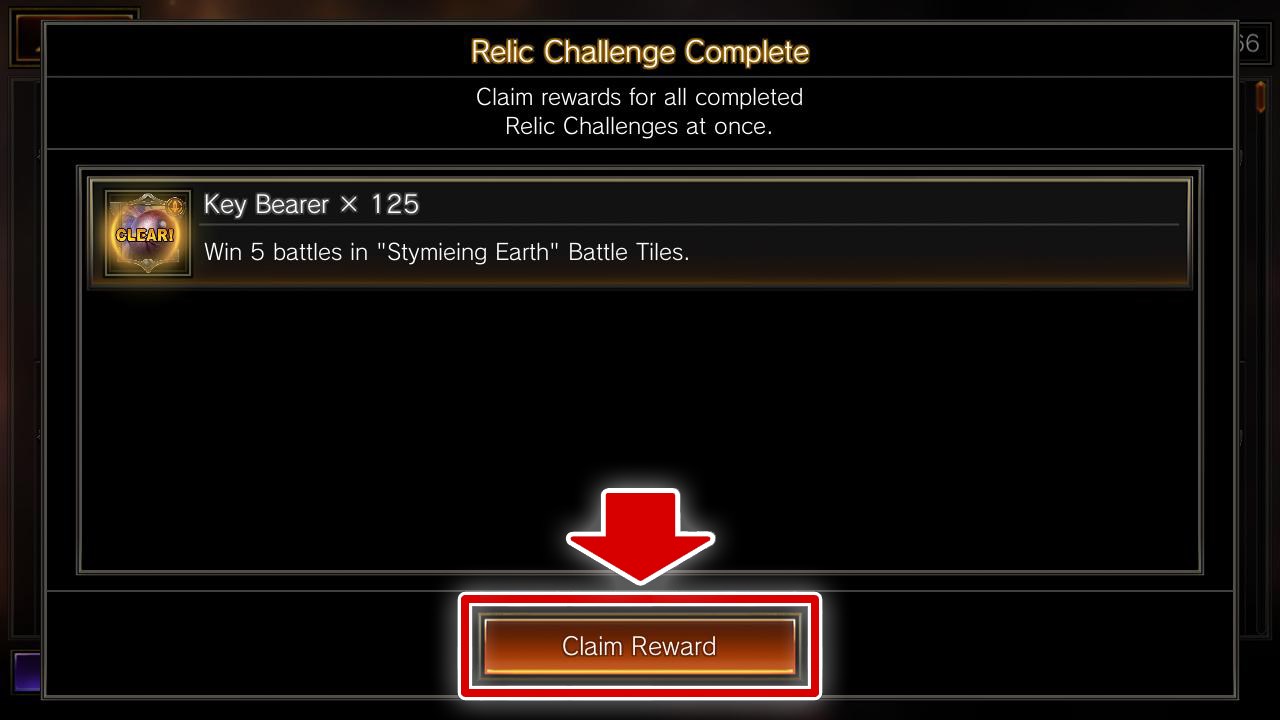 |
6. Once the Challenge requirements are cleared, go to "Edit Deck/Relics" or "Relic List/Enhancement" to collect the Relic Challenge rewards!
Select "Claim Reward" to receive your Relic!
You can get your rewards from "CHALLENGE," which I will explain next!
Take note that rewards you get from Relic Challenges will NOT go to your Present Box! |
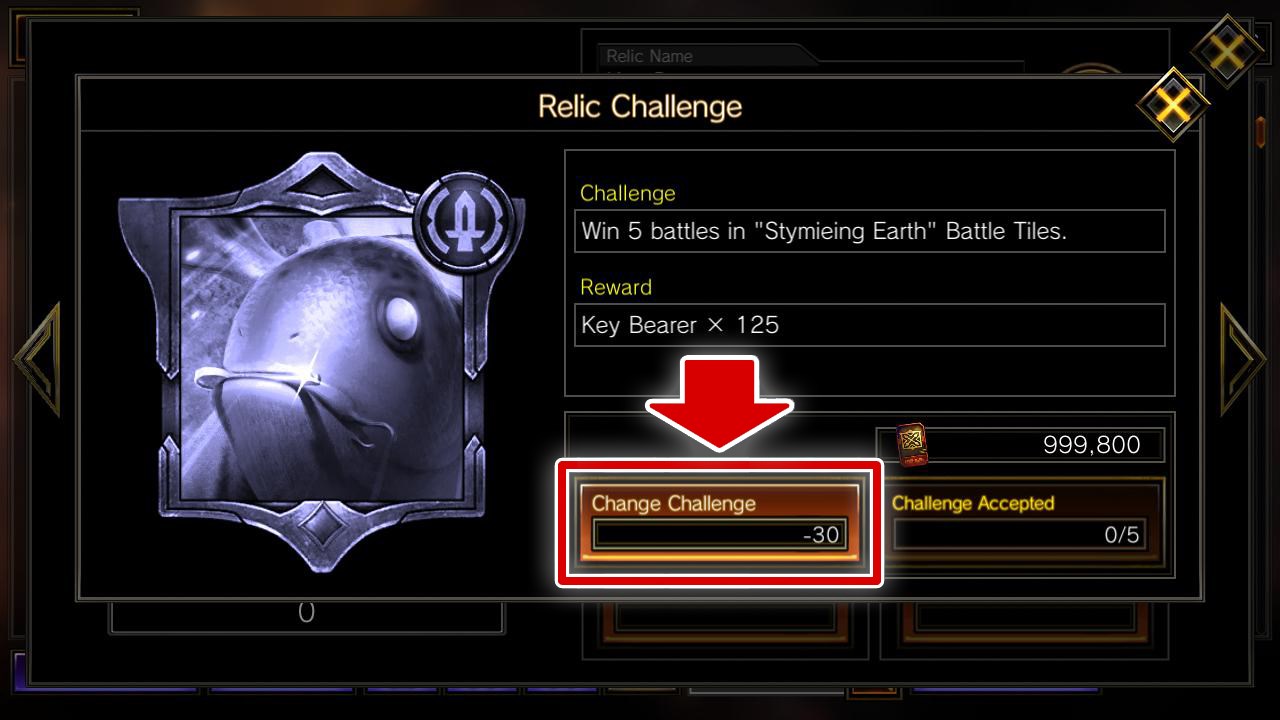 |
7. If you feel that the Challenge is way too hard, just select "Change Challenge" to modify it.
But you'll also need Relic Tickets to change it! Changing the Challenge will reset your progress, so be careful!
|
Now... I promise you that I’m finally done explaining Relics!
As I said before, given how many factors there are to this, I suggest you read this again if you’re unsure about anything.
As I said before, given how many factors there are to this, I suggest you read this again if you’re unsure about anything.
Other Elements
Complete Challenge and Get Rewards!
Adventure contains various Challenges.
You can get rewards for clearing, so give them a shot!
You can get rewards for clearing, so give them a shot!
 |
You can check challenge details by selecting “Challenge” from Adventure Top. |
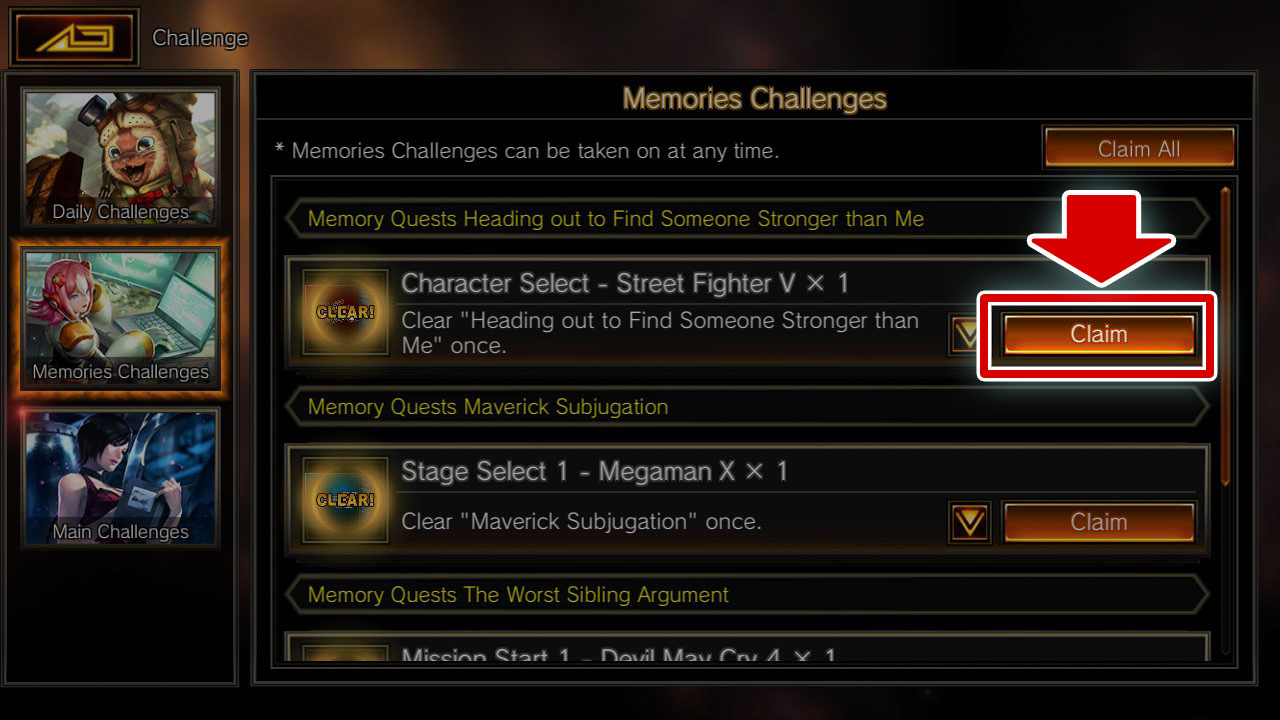 |
When you clear a Challenge, the “Claim” button will appear.
Select “Claim” and your rewards will be sent to your Present Box. As another friendly reminder: rewards from Relic Challenges will NOT be sent to your Present Box!
|
Now that you know how to check your Challenges, we’ll talk about the types of Challenges next.
There are many different Challenges, but they can be divided into five types.
There are many different Challenges, but they can be divided into five types.
■ Daily Challenges
Up to four of these Challenges can be attempted at the same time.
They will reset daily until you complete a certain amount!
Up to four of these Challenges can be attempted at the same time.
They will reset daily until you complete a certain amount!
What separates these from other Challenges is that your rewards will automatically go into your Present Box.
■ Memories Challenges
These Challenges are related to Memory Quests.
These Challenges are related to Memory Quests.
■ Main Challenges
These Challenges are related to Main Quests.
These Challenges are related to Main Quests.
■ Campaign Challenges
These Challenges are related to limited-time Campaign Quests.
Even if you complete these, be aware that when the Campaign Quest is over, you won’t be able to claim your rewards after a certain amount of time!
These Challenges are related to limited-time Campaign Quests.
Even if you complete these, be aware that when the Campaign Quest is over, you won’t be able to claim your rewards after a certain amount of time!
■ Relic Challenge
Relic Challenges operate just as I explained earlier.
Your accepted Relic Challenges are displayed on the CHALLENGE screen.
Relic Challenges operate just as I explained earlier.
Your accepted Relic Challenges are displayed on the CHALLENGE screen.
Gather Pieces and Get Rewards!
When you complete Battle Tiles you have a chance to get a “piece.”
Gather enough pieces to complete an image, and depending on how many pieces you collect, you can get various rewards such as icons!
Gather enough pieces to complete an image, and depending on how many pieces you collect, you can get various rewards such as icons!
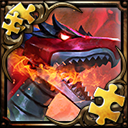
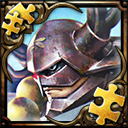
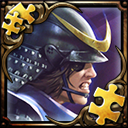
There are many different images to fix, so collect pieces and complete them all!
You can check your collected pieces and rewards by following the steps below.
You can check your collected pieces and rewards by following the steps below.
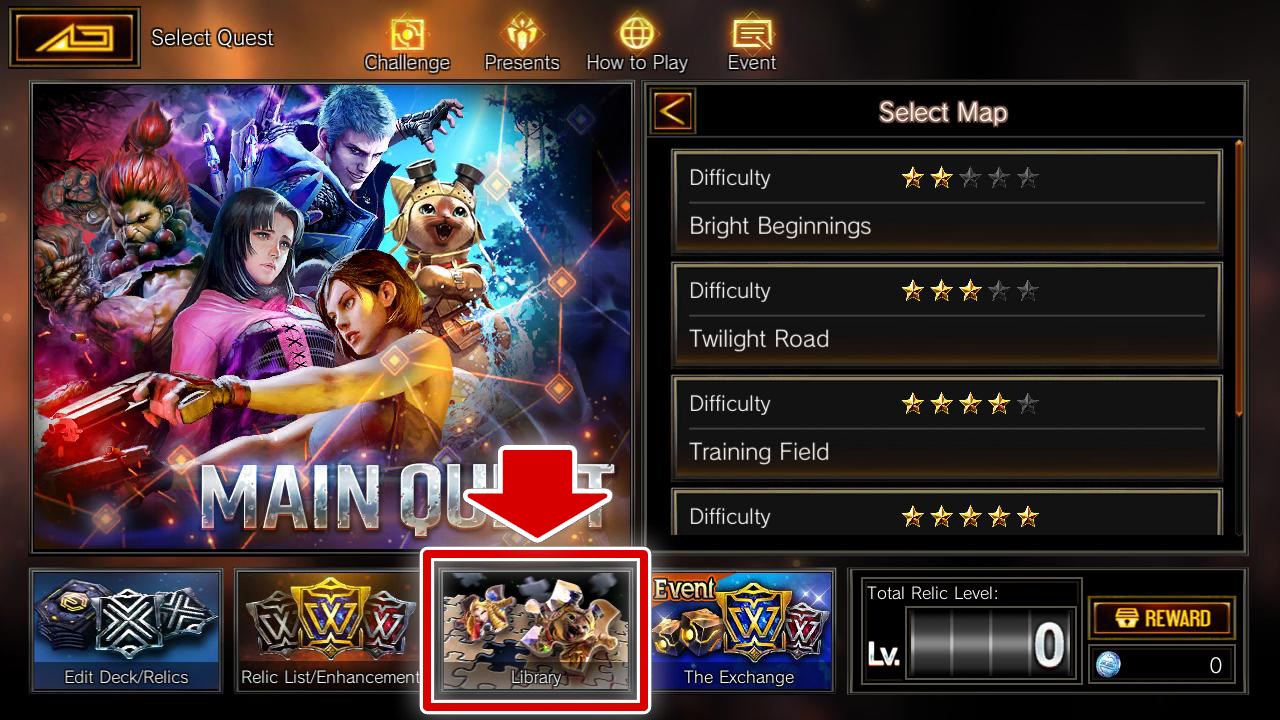 |
1. Select “Library” from Adventure Top. |
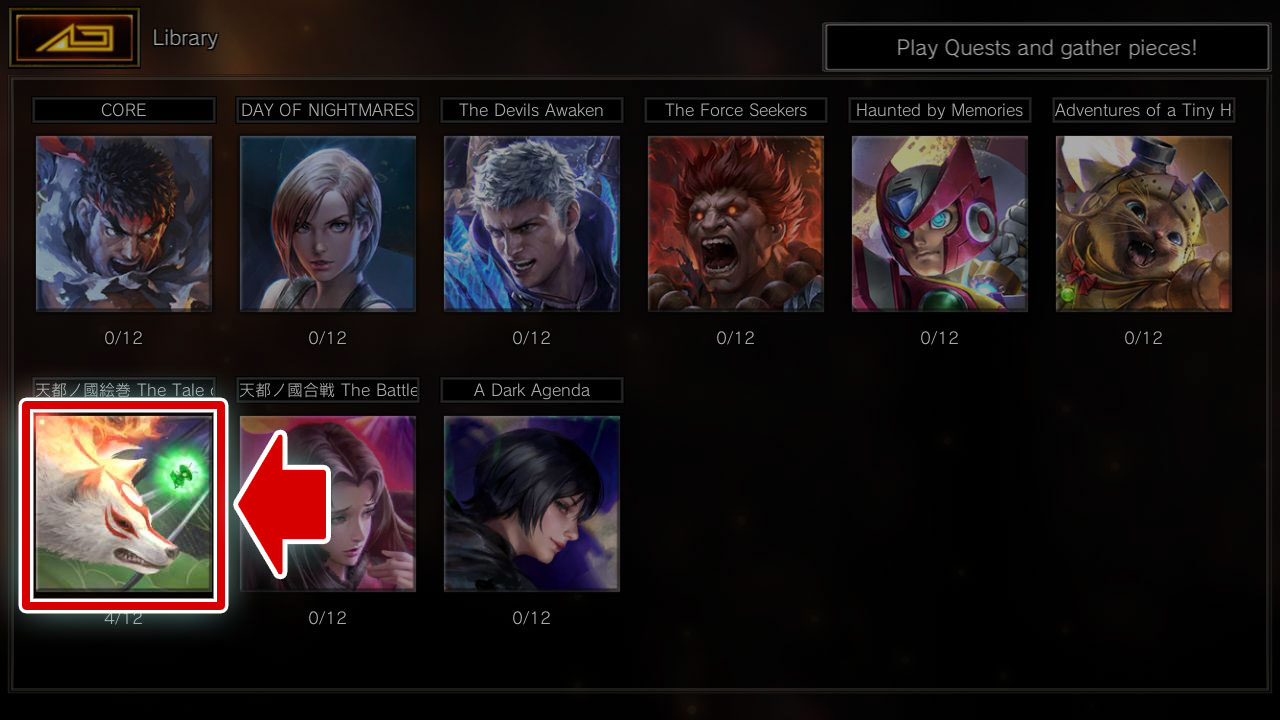 |
2. Click on an image to see its progress. Under the image you will see the total amount of pieces needed and how many you already have. |
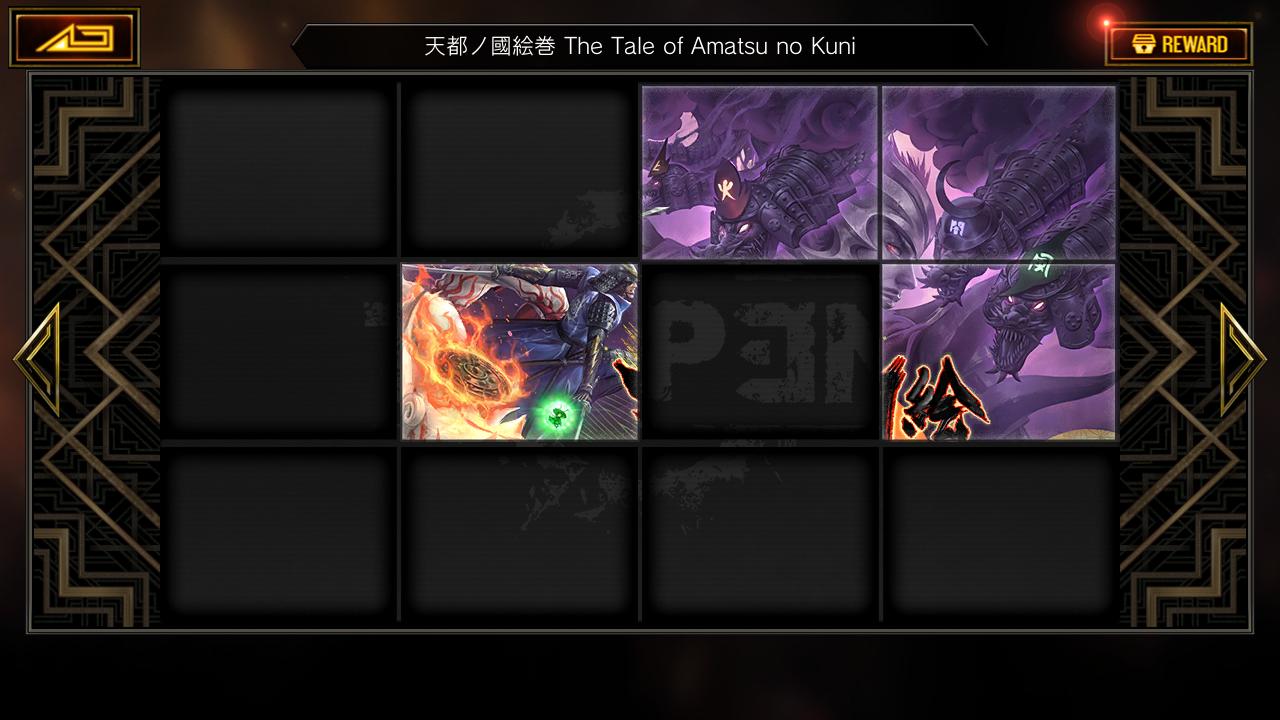 |
3. You can view your gathered pieces. |
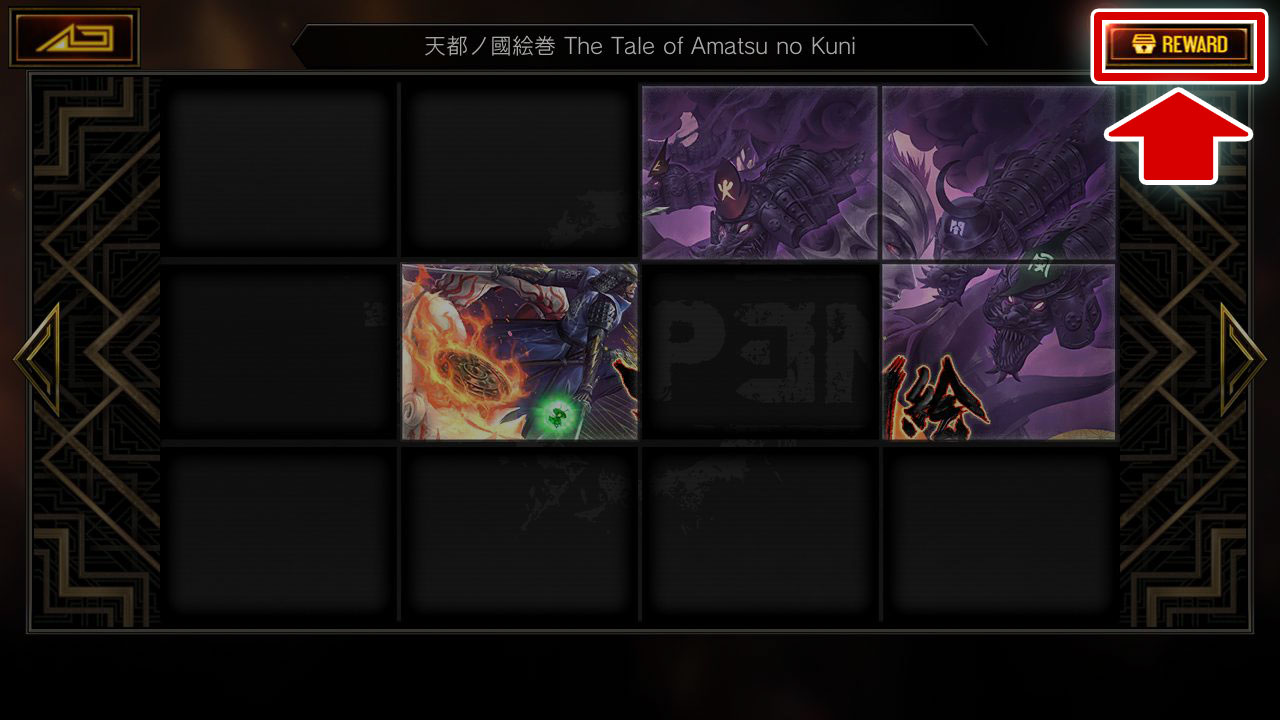 |
4. Select “REWARD” to move to the rewards screen. |
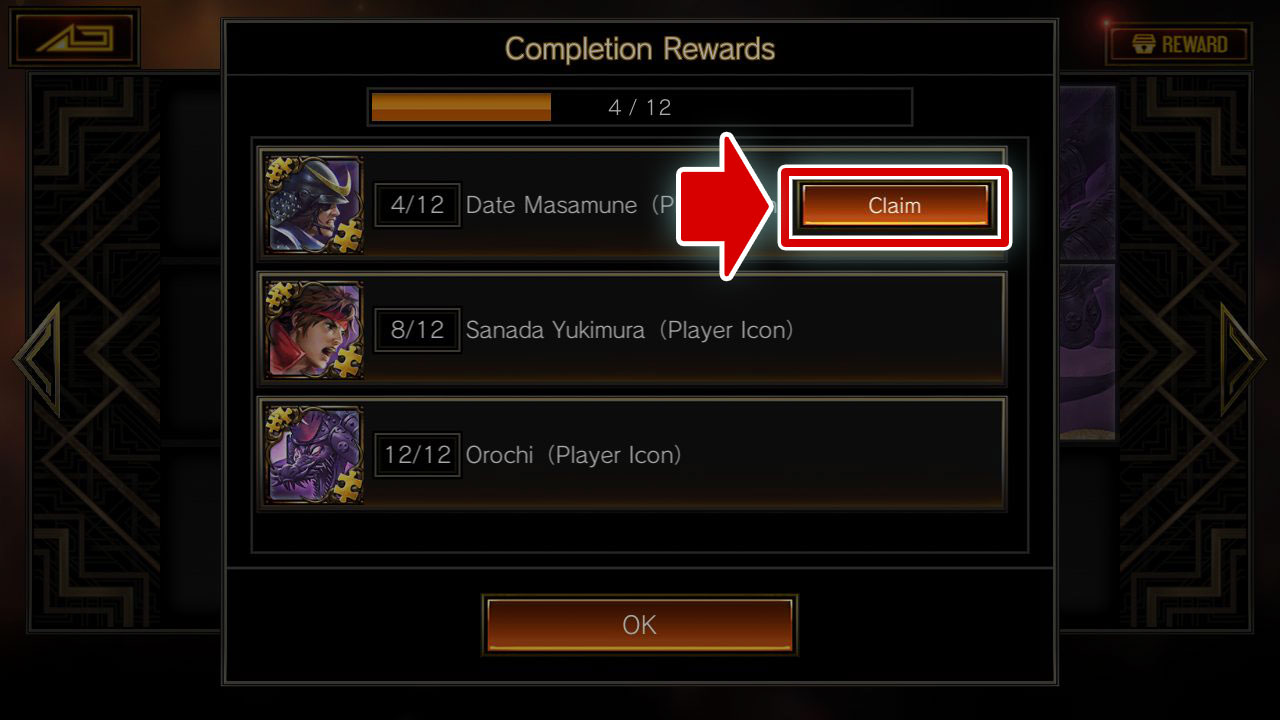 |
5. Select “Claim” and your rewards will be sent to your Present Box. |
Trade for Items at the Exchange!
You can trade for various items at the Exchange in Adventure!
More and more items will become available for exchange, so check back often for information on new items!
More and more items will become available for exchange, so check back often for information on new items!
You can exchange for items by following the steps below.
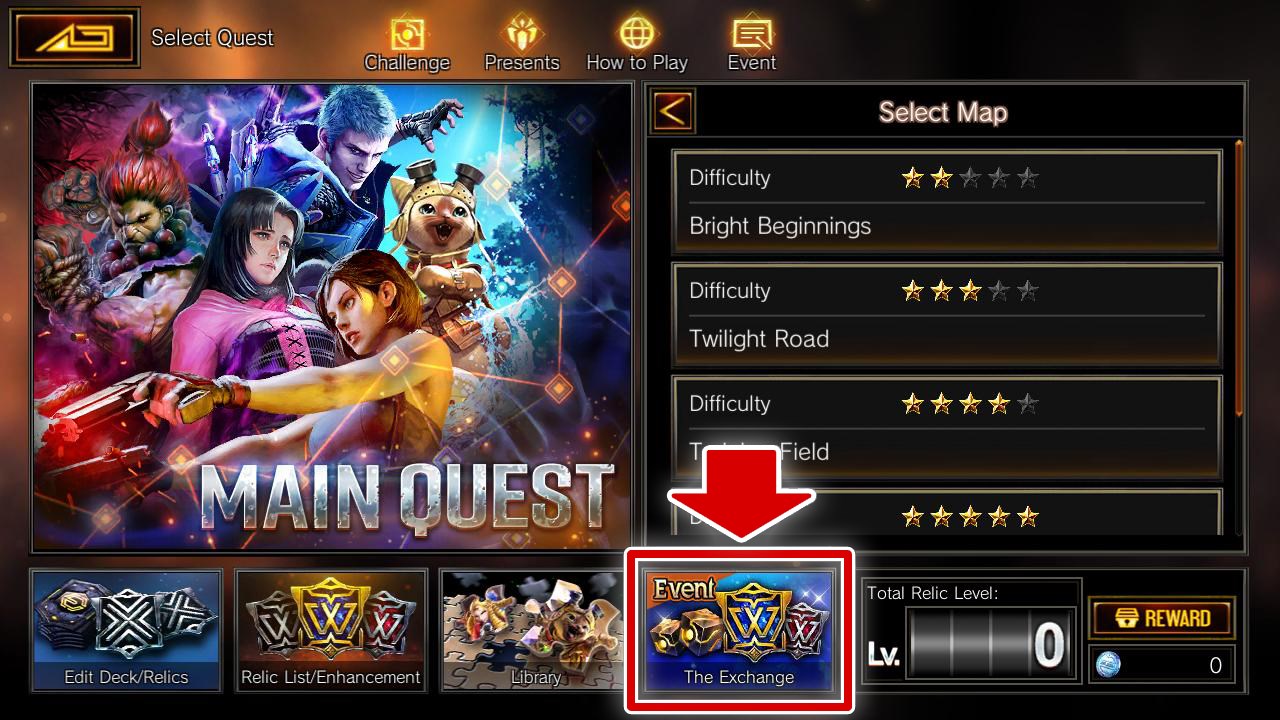 |
1. Select “The Exchange” from Adventure Top. |
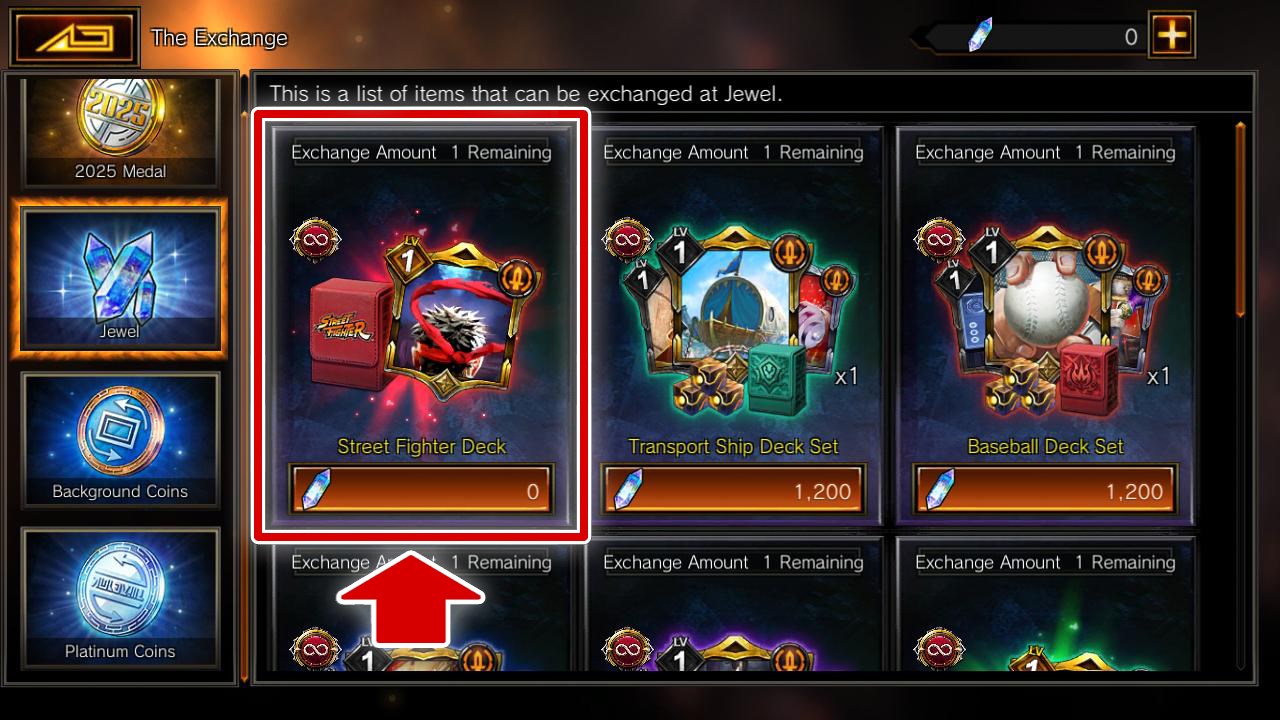 |
2. Find the item you want to exchange for in the list. |
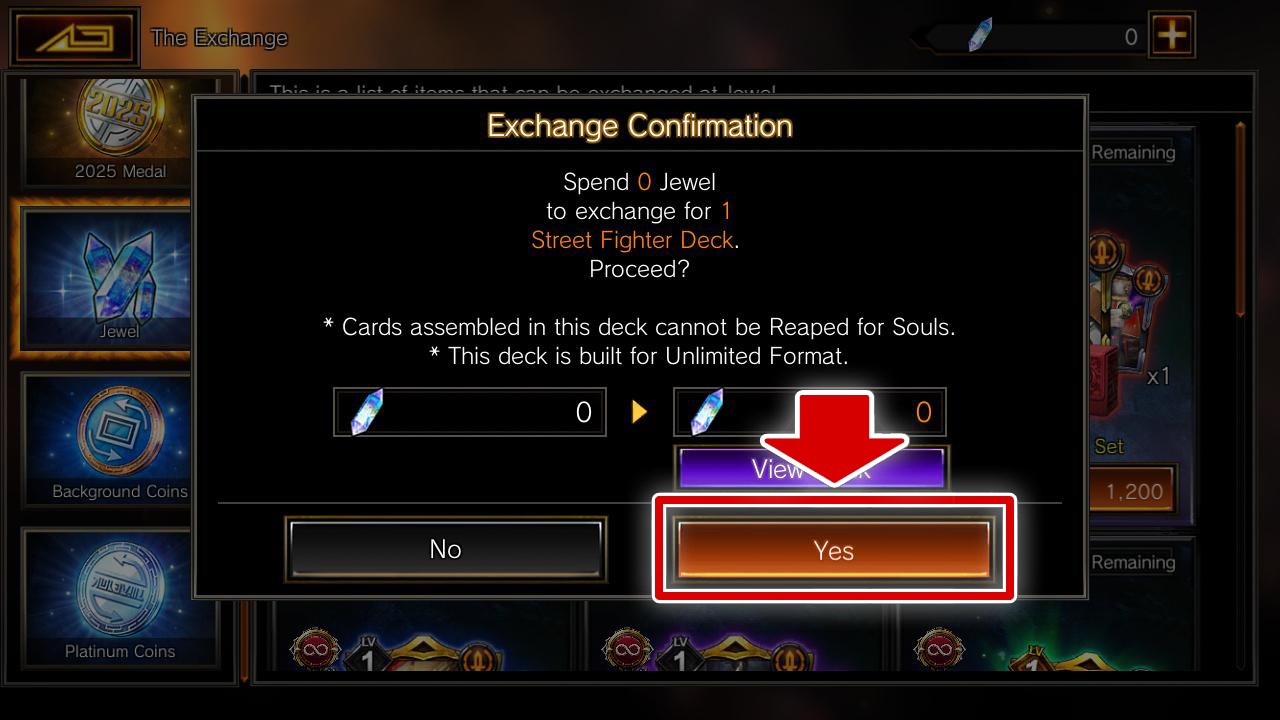 |
3. Exchange for the item! The exchanged item will be sent to your Present Box. |
■ Raise your total Relic level and collect Platinum Coins!
Platinum Coins are items you can obtain by raising the total level of the Relics you own!
Platinum Coins can be used to exchange for items such as Legendary Relics and Hero Auras, so be sure to level up your Relics to get lots of Platinum Coins!
Platinum Coins are items you can obtain by raising the total level of the Relics you own!
Platinum Coins can be used to exchange for items such as Legendary Relics and Hero Auras, so be sure to level up your Relics to get lots of Platinum Coins!
Follow the steps below to check your current total Relic level and the level at which you can obtain Platinum Coins.
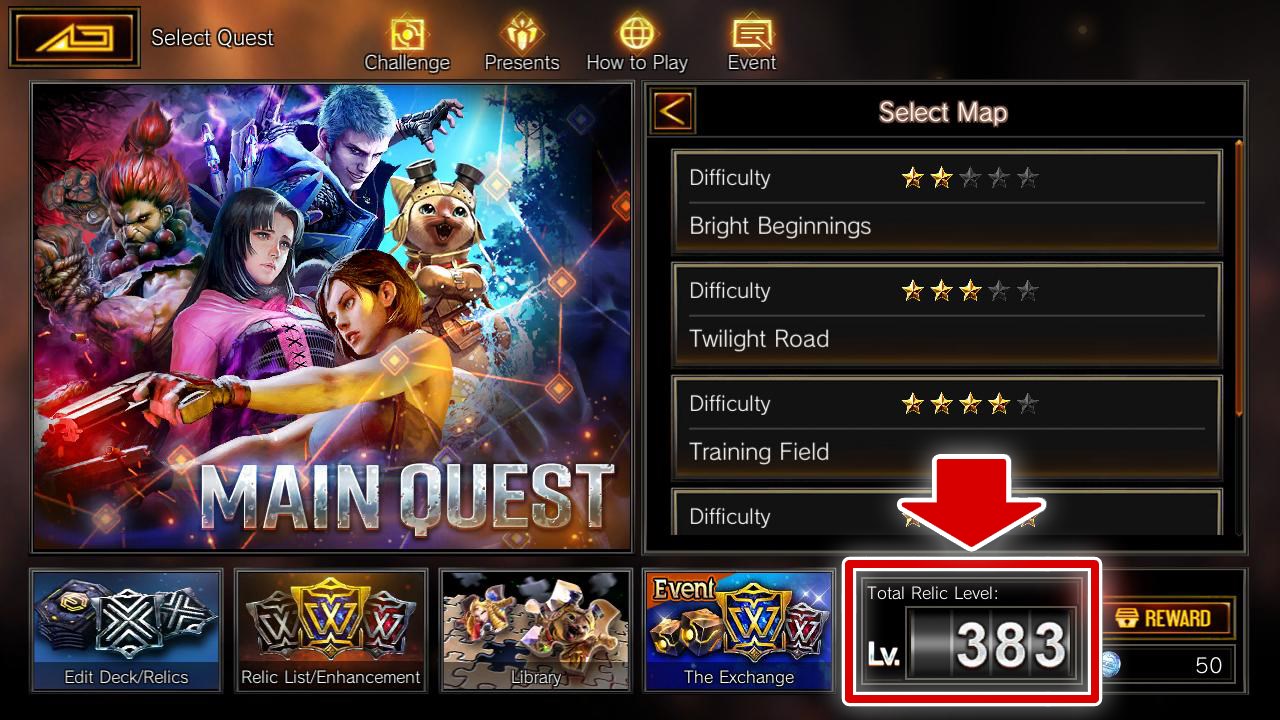 |
①You can check the total level of your Relics on the Adventure screen. |
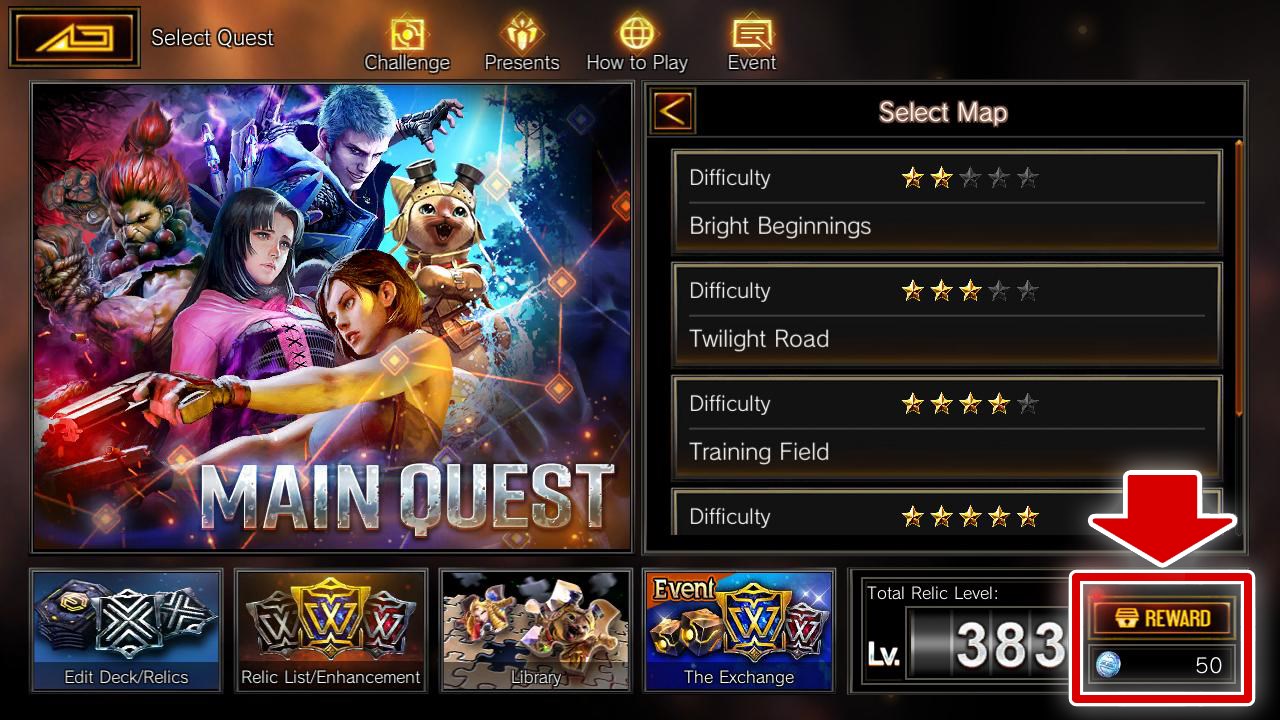 |
②Select "Reward" to move to the total Relic level rewards screen. |
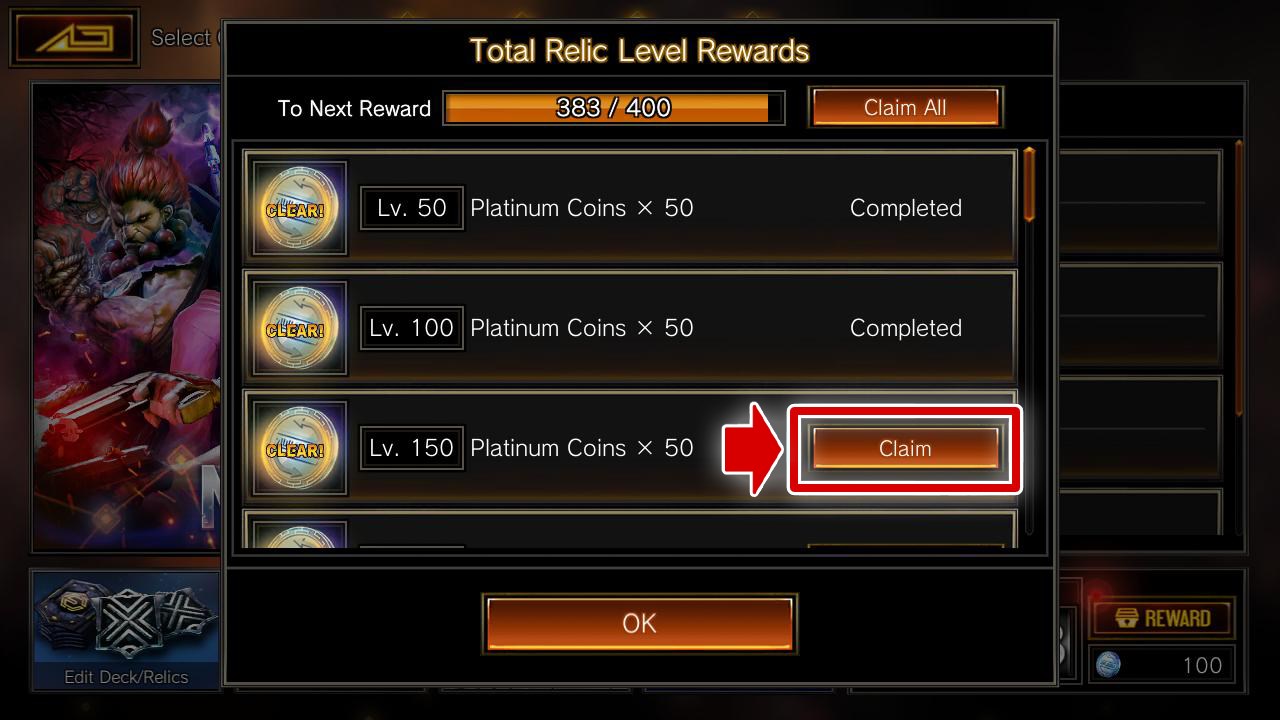 |
③Select "Claim" or "Claim All" to receive your Platinum Coins.
Keep in mind that Platinum Coins are not sent to your Present Box!
|
■ Power up your decks with Legendary Relics!
Exchange Platinum Coins for Legendary Relics and add them to your decks right away!
Exchange Platinum Coins for Legendary Relics and add them to your decks right away!
Legendary Relics have two features: you can only add one to a deck, and they have priority over other Relics when drawn.
What's that? You're curious about what effects Legendary Relics have?
Well, let's briefly introduce the Legendary Relics that can be exchanged!
Well, let's briefly introduce the Legendary Relics that can be exchanged!

|
Blistering Fist
Lv. 1:Randomly increase the Attack of friendly units by a total of 40. This relic will be prioritized when drawing. |
|
|
Guardian's Prayer
Lv. 1:Randomly increase the HP of friendly units by a total of 70. This relic will be prioritized when drawing. |
|
|
Glowing Feather
Lv. 1:Randomly decrease the MP cost of friendly units by a total of 20. This relic will be prioritized when drawing. |
|
|
Electricity Surge
Lv. 1:Randomly decrease the MP cost of friendly Action Cards by a total of 10. This relic will be prioritized when drawing. |
|
|
Mask of the Thunder Wolf
Lv. 1:Give all friendly units +1/-1 and <Rush>. This relic will be prioritized when drawing. |
|
|
Veteran's Knife
Lv. 1:Give all friendly units <Agility>. This relic will be prioritized when drawing. |
|
|
Alluring Talons
Lv. 1:Give all friendly units -1 Attack and <Combo>. This relic will be prioritized when drawing. |
|
|
Playing Cards
Lv. 1:Change the MP cost of 2 Action Cards in your deck to 1 and add them to the EX Pocket. This relic will be prioritized when drawing. |
|
|
Dartboard
Lv. 1:Give 1 friendly unit in your hand <MP Boost: 100>. This relic will be prioritized when drawing. |
|
|
Hookshot
Lv. 1:Place 1 random friendly Unit Card in your deck onto the field. This relic will be prioritized when drawing. |
|
|
Gunlance
Lv. 1:Add 1 random friendly Unit Card from your deck to the EX Pocket and give it +5/+5. This relic will be prioritized when drawing. |
|
|
Unlocked
Lv. 1:Give 1 random friendly unit in your deck <Flight>, <Heavy Pierce>, <Crush>, <Combo>, <Veil>, and <Spillover>. This relic will be prioritized when drawing. |
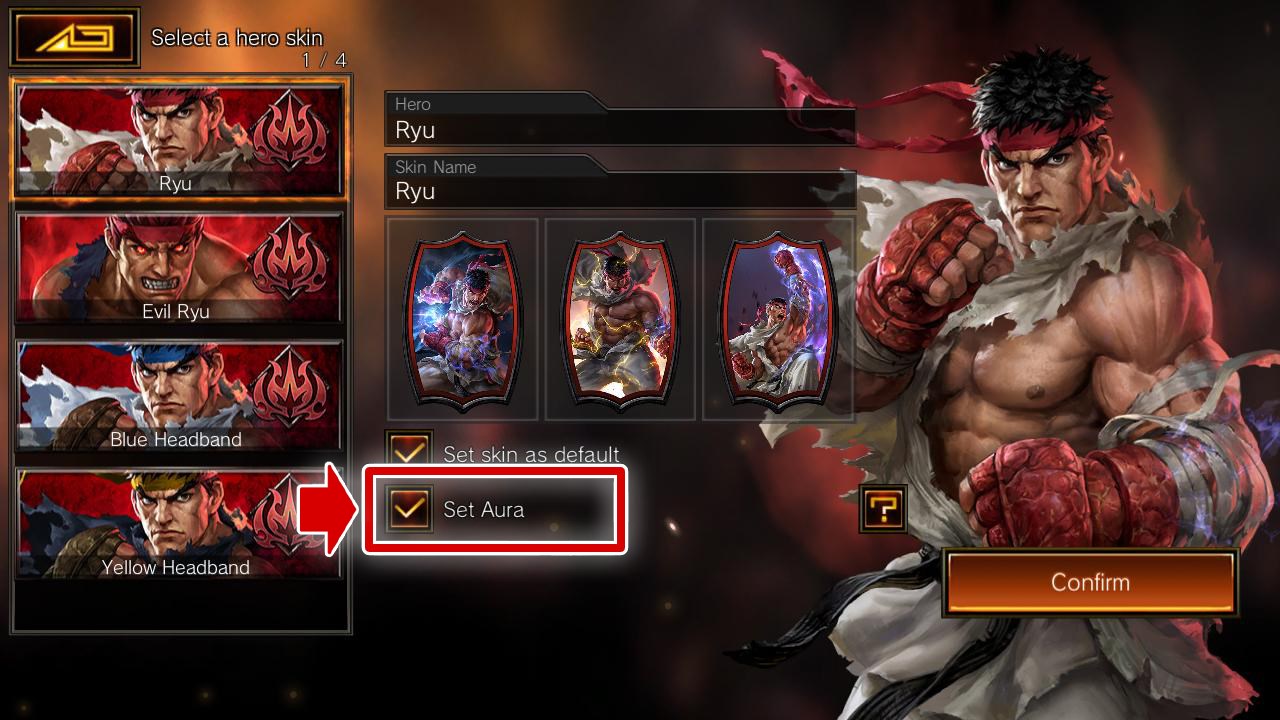
■ Heat up your battles by setting a Hero Aura!
Hero Auras appear around Heroes in Adventure!
Use Platinum Coins to exchange for a Hero Aura to be equipped by your own Hero!
Hero Auras appear around Heroes in Adventure!
Use Platinum Coins to exchange for a Hero Aura to be equipped by your own Hero!
When you set a Hero Aura, it will appear during Ranked Matches and Adventure battles!
Navigate to Home Screen → Cards → Edit Deck → Change Skin → Set Aura for your Hero to equip one!
We did it! Everything in Adventure has been explained!
There’s really so much to learn in this article!
There’s really so much to learn in this article!
You can check this page in the “How to Play” section from Adventure Top, so come back anytime you’re having trouble!
Extra
Here’s Some Relics You’ll Encounter!
Oops, I forgot to show you some actual Relics!
Take a look at these.
Take a look at these.
■ Battle Relics
|
|
Chain Saw
Lv. 1 : Give all friendly units with an MP cost of 7 or more and <Ascended> +1/-1. Lv. 2 : Give all friendly units with an MP cost of 6 or more and <Ascended> +1/-1. Lv. 3 : Give all friendly units with an MP cost of 5 or more and <Ascended> +1/-1. Lv. 4 : Give all friendly units with an MP cost of 4 or more and <Ascended> +1/-1. Lv. 5 : Give all friendly units with <Ascended> +2/-1. |
|
|
Frozen-Solid Meat
Lv. 1 : Give all friendly units with an MP cost of 5 or more and <Growth> +2 HP. Lv. 2 : Give all friendly units with an MP cost of 5 or more and <Growth> +3 HP. Lv. 3 : Give all friendly units with an MP cost of 4 or more and <Growth> +3 HP. Lv. 4 : Give all friendly units with <Growth> +3 HP. |
|
|
Axl Bullets
Lv. 1 : Give all friendly units <Rush>. Lv. 2 : Give all friendly units +1 Attack and <Rush>. Lv. 3 : Give all friendly units +2 Attack and <Rush>. |
■ Instant Battle Relics
|
|
Mountain of Donuts
Lv. 1 : Give all friendly units with an MP cost of 5 or less -3/+4. Lv. 2 : Give all friendly units with an MP cost of 5 or less -3/+6. Lv. 3 : Give all friendly units with an MP cost of 5 or less -3/+8. Lv. 4 : Give all friendly units with an MP cost of 5 or less -3/+10. Lv. 5 : Give all friendly units with an MP cost of 5 or less -3/+15. |
|
|
Piercing Blade
Lv. 1 : Give all enemy units with an MP cost of 9 or more -1 Attack. Lv. 2 : Give all enemy units with an MP cost of 8 or more -1 Attack. Lv. 3 : Give all enemy units with an MP cost of 7 or more -1 Attack. Lv. 4 : Give all enemy units with an MP cost of 6 or more -2 Attack. |
|
|
Phantom Beast's Horn
Lv. 1 : Give your Hero <MP Boost: 30>. (15 seconds) Lv. 2 : Give your Hero <MP Boost: 30>. (25 seconds) Lv. 3 : Give your Hero <MP Boost: 30>. (45 seconds) |
■ Map Relics
|
|
Threat Scanner
Lv. 1 : Mark 1 of the tiles adjacent to a Battle Tile you've already cleared as complete. |
|
|
Lighter
Lv. 1 : Mark up to 2 of the tiles adjacent to a Battle Tile you've already cleared as complete. |
|
|
Tarot Cards
Lv. 1 : Change 1 opened Relic Tile into a Gold Treasure Tile. |
And these are just scratching the surface of Relics.
Discover even more by going on an Adventure!
Discover even more by going on an Adventure!
Unlike Ranked Match and Point Match, Adventure is slow-paced and something you can enjoy alone!
Even if you struggle in battles, you can aim to clear the game by using Relics, so give it your best!
Even if you struggle in battles, you can aim to clear the game by using Relics, so give it your best!
Now go out there and have fun playing TEPPEN!